Archive for the ‘Finished objects’ Category

Sunny

Last post I promised sunny. The weather has been anything but, so I’ve had to make some sun instead.

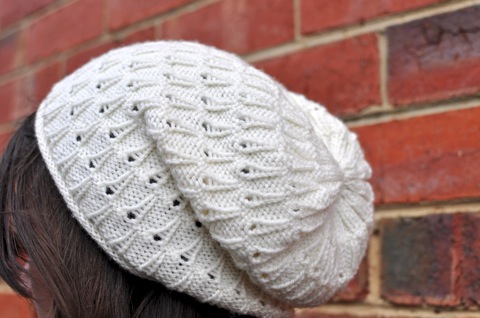
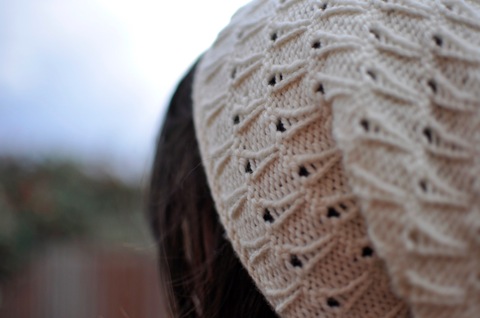
Gaptastic Cowl by Jen Geigley (rav link)
200g Bendigo Woollen Mills Rustic 12 ply, Sunflower
8.00mm needles
Start: February 2011
Finish: March 2011
Modifications: Smaller needles, cast on more stitches, knit fewer rows
Ravelryed: here

This is such a straightforward pattern, but the result is very pleasing. The pattern suggests making it 15 inches in width, but I only made it 8.25 inches. I never wanted to make it 15 inches wide as it would just be too bulky for me, but as luck would have it, I ran out of yarn just after half way. As it is, I’m really happy with the width.

For a long time I was anti-cowl, but this pattern has made my steely resolve waver somewhat. I’m still not a huge fan of the smaller cowls, but there are a few longer cowls that I might consider making in the future.

The yarn started life as a diagonal lace scarf. However, it curled badly so I ended up with a kind of draught stopper/rope thing. It seems much happier to be a big seed stitch cowl. It’s possibly a little rough for use around my neck, but I got used to it pretty quickly.

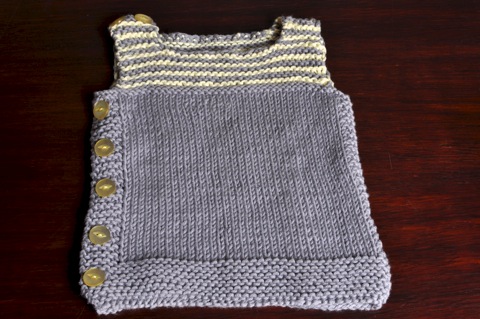
I’m starting to feel like the kiss of death for certain Bendigo Woollen Mills colourways. Sunflower and the light grey I used in my Golden Hands striped vest, were discontinued a few years ago. This run continued last week when this year’s shade card arrived — two lovely rusty red colours, Rust in Rustic and Tuscan in Classic, have also been discontinued. So, if there are any Bendigo Woollen Mills colourways that you’re not a fan of, let me know and I’ll start liking them. It’s a surefire way to get them discontinued.

As a postscript to my last post, I’ve decided to frog Pickadilly. The more I think about it, the more I’m convinced that they problem lies at the yoke. I’m determined to make it work, but it does mean reworking the pattern (again) to make it fit well. As DrK mentioned, top down raglans aren’t as easy as they appear on the surface, even though they’re often put forward as the ‘easy’ jumper pattern. While seeing a jumper or cardigan (slowly) appear before your eyes is very alluring, it doesn’t make it immune from fit issues. This pattern is a perfect example of that for me. Thank you everyone for you input, you all helped me take the in out of indecision.

Golden Hands striped vest

It seems ridiculous that we’ve reached the third month of the year, and I’ve only just finished my first knitting project. If I’m being accurate, it was finished in late February, but that fact doesn’t seem to diminish the level of ridiculousness. Anyway, enough grizzling. Onward and upward!

Striped vest

Tailored waistcoat from Golden Hands Volume 1 (page 6)
About 180g Bendigo Woollen Mills Rustic 8ply, Graphite
About 100g Bendigo Woollen Mills Rustic 8ply, Flannel
4.00mm and 3.50mm needles
Start: November 2010
Finish: February 2011
Modifications: none that I can recall
Ravelryed: here

I’m mostly pleased with how the vest turned out. The curved front pieces are a really nice touch, as is the invisible cast on which was used on all the ribbing. Almost all the ribbing was knit as separate pieces and seamed, which was a necessary evil given the cast on. I did notice though that the ribbing did not hide sloppy seaming; I ended up having to redo the ribbing around the armholes because my sloppy finishing resulted in the ribbing bulging out. Once I stopped being lazy and started paying attention to what I was doing, the ribbing came out really nicely.

curved front

At the moment I’m hesitant to call the vest a success because of two pretty big things that I’m uneasy about. The first is the waist shaping: the shaping from hip to waist is pretty severe which makes that section jut out a bit. It’s possibly only noticeable only to me, but if I had my time again, I’d space the increases out a little more.
too short?

The second is the length: as I was knitting the back it looked like it was bordering on being too long, but when I tried it on, it was bordering on too short. I’ve given it a pretty severe blocking, but am not sure it’s helped much. Unfortunately I’ve run out of graphite, so it’s not possible to add in a couple more stripes. I’ll just have to learn to live with it.

Although I have a couple of reservations (none of which I might add are fatal flaws, but merely things to be wary of), it is a pretty straightforward pattern and it makes for a nice plain vest. If you are interested in this pattern and are located in Australia, it’s worth scouting around op shops as I often see copies of Golden Hands in the ones I frequent.

Now that I’ve finished something, it feels like my crafting year has finally commenced. It’s such a relief to know that I’ll have at least one finished project this year!

Matt’s Dashing Jumper

Thank you everyone for your kind words and new year wishes. I hope the start of the year has been nice and relaxing (or completely frantic, depending on your preferences).

It seems difficult to start with the new year with the past still lingering in the background. As mentioned in the previous post, I’m really pleased with 2010’s last finished knitting project.

Dashing jumper

Shirt from Patons book 929, Quiet Days in Jet and Skol
5.5 skeins of Cascade Yarns 220 Heathers, Bainbridge
3.75mm and 5.00mm needles
Start: September 2010
Finish: December 2010
Modifications: Shorter body, lengthened sleeves
Ravelryed: here

This is the second jumper I’ve made for Matt and I think it was a much greater success than the first one. Most importantly, this is the first attempt at knitting it, as opposed to the one and a halfth or second or whatever version I got to on the suave sweater. It’s also a bit more fitted than the first one so I think it’ll get a bit more wear. All in all, another win for Patons knitting patterns from the 70s!

Like most of my knits these days, it was largely stocking stitch, but I don’t remember getting bored at all. In fact, I’d go as far as to say that I’m in slight mourning that I don’t have to work on it anymore. That’s not to say I’ll be unravelling it and starting again though…

Cascade 220 was great to knit with. The yardage/meterage was fantastic and the colour matched the pattern well. Initially I had concerns the twists would disappear in the slightly flecky yarn, but I think it looks fine. Most importantly, 6 skeins was exactly the right amount. There’s probably enough left over for a hat, but not much more.

buttons

The buttons, as usual, are from Buttonmania.

Normally the end of a project signals the beginning of another. In this case, finishing Matt’s jumper brought me back to two works in progress which is my usual number. I’d love to start something new, and have already chosen my next project, but really must finish something off first!

Round up 2010

In thinking about this post, I was chiding myself about my lack of productivity. Only fourteen finished objects, for shame! Then I thought about it a bit — this year I went overseas, provided Matt with the tiniest little bit of help in releasing his first Mac app, restored some outdoor furniture, completed a graphic design short course (which included doing some cross stitch for the first time in a long long time) *and* finished fourteen knitting projects. So now I understand why, in the twilight of 2010, I’m feeling quite tired.

mosaic 2010

It seems the knitting theme for this year was dark and grey. For many years I was very much a brown and green lass, but these days it’s all about the grey. Looking at my Ravelry queue, next year may be fairly grey too. Just for variety’s sake, I’ll try to provide the odd flash of colour where I can.

A lot of these knits have been used or worn a lot. Matt’s gloves, my herringbone mitts and Still got a good work out during the depths of winter. My grandfatherly vest has been fantastic in this indecisive weather, and Bottom’s Up, despite my concerns about it being too short, is starting to get quite a good run. This encapsulates knitting as a hobby for me; as enjoyable as I find creating objects using sticks and string, it’s knowing that my projects will be used and loved that provides the greatest satisfaction.

It probably a bit funny to follow that profound statement with the declaration of my favourite project of the year, particularly because it’s as-yet unworn and unblogged. Without stealing too much material for my next blog post, I’m thrilled to bits with how Matt’s dashing jumper turned out.

Fare thee well 2010. Let’s hope 2011 will be just as productive, and a little less tiring. Thank you everyone for your comments, emails and readership, I really appreciate the time everyone takes to read my funny little blog.

Little paper stockings

For a good part of yesterday afternoon, Matt and I worked on putting these little beauties together. As many of my non-knitting projects do, this started off as a childhood memory. When I was younger, I really liked receiving those clear plastic stockings filled with popular chocolate bars for Christmas. They’re admittedly cheap, overpriced tat, but there’s no accounting for taste when you’re younger (my love of New Kids on the Block is another example of my dubious taste as a child). From that little seed of a memory, I made my own version of them.

paper stockings

Because they’re pretty quick to put together, and thus could work as a last minute gift, I thought I’d note down how we went about making them.

Ingredients:
Stocking template
Paper
Pencil
Eraser
Sewing thread
Scissors

Wrapped sweets

Method:

I’m not good at drawing, so I found a stocking template on Google Images to trace around. My stockings ended up being around 18cm long, 8.5cm wide at the top and the foot 12.5cm long. However, rather than be prescriptive about it all, I recommend finding a template that appeals and go with that. Or, if you are that way inclined, draw a stocking shape freehand.

traced out stockings

We then traced the stocking shape onto a double layer of paper. We used brown paper from a large stationery chain store and could fit three stockings across the width of the paper. The most important thing about selecting paper to use in this project is to choose something that is strong enough to hold the weight of the sweets and treats you wish to put in them, but not so stiff that it can’t be closed up at the top.

At this point it’s probably best to cut around the stockings, leaving a 0.5-1cm seam allowance, but as my sewing skills are about as good as my drawing skills, I sewed around the stockings first using my sewing machine then cut them out. In some ways this was a good exercise in sewing machine control for me… in fact, it’s possibly something I should have done before launching into sewing garments. Oh well, you live, you learn.

sewn stockings

Then we erased any visible pencil marks, and filled with a delightful assortment of wrapped lollies. I found it a bit difficult to get lollies into the toe of the stocking. This slight issue could easily be alleviated by making a bigger stocking, or using a template where the foot is not at a right angle to the leg.

stocking with lollies

Once the stocking is filled with treats, sew up the top, trim any excess thread and any excess paper at the top, and you’re done!

‘Tis a really simple project; in fact, I’m wondering whether I really needed to write out directions. Unnecessary though they may be, they do provide a good segue way into wishing you all a very relaxing and enjoyable holiday period. Stay safe if you’re driving anywhere, and beware of snow drifts (this goes for people in the northern or southern hemisphere!).

Little details

It’s astounding how seemingly quick projects can be held up by little, but important, details. A fine example of this is a couple of small baby items I started nearly two months ago. The knitting portion of the projects was completed very quickly, but finding the right buttons was really difficult. I visited all my usual haunts (and lamented the shrinking collection of buttons at the Elizabeth Street Clegs), but couldn’t find anything suitable. Finally the right buttons were found and the projects finished.

Pebble

Pebble by Nikol Lohr
1 ball Freedom Sincere DK, grey; a skerrick of Freedom Sincere DK, yellow
4mm needles
Start: November 2010
Finish: December 2010
Modifications: slightly larger needle, small row- and stitch-count changes accounting for gauge, striped garter stitch section
Ravelryed: here

Now that it’s all done and photographed, I’m a little disappointed with how this version of Pebble turned out. Pretty much all of this is down to two decisions I made when first starting Pebble.

The first problem is the yarn choice. As my friend’s baby was due in November, I thought using a cotton yarn would be more practical as we’d ordinarily be heading into warmer weather. So far, this summer can only be described as tepid, so a wool-based yarn might have been ok. It’s been quite some time since I’ve worked with cotton, and had forgotten how unforgiving it is relative to wool. So, the fabric’s probably a bit more uneven than I’d like, and some of the weaving in of ends shows through a little bit on the front.

The second problem is my dogged insistence to have a striped yoke (if it indeed can be called a yoke). Initially I wanted to make the garter stitch section blue, yellow and grey. As it wasn’t possible to hide the edge where I carried the yarns, it looked really messy and was quite bulky. By this stage my friend’s little girl was born so the blue was ditched and the garter stitch section consisted of grey and yellow stripes. Even with one less colour and strand of yarn it still looks a bit messy and bulky.

Despite my mild disappointment with the end result, I think, and hope, it’s still wearable.

ends

One thing I should mention about the pattern is the number of ends it produces. This wasn’t helped by using two colours in the top section, but it still seemed like quite a large number for such a small garment. The photo above shows how many ends were woven in… So don’t be fooled by the fact it requires no seaming. You will be paying for that privilege in the form of weaving in ends.

Happily, the other quick project for my friend’s baby girl turned out quite well. As it happens, there’s a free bib pattern out that roughly matches the pebble vest.

Bibs

Easy Peasy Baby Bib by Michelle Acuavera
Scraps Freedom Sincere DK, grey
4mm needles
Start: November 2010
Finish: December 2010
Modifications: smaller needle, small row- and stitch-count changes accounting for gauge, striped garter stitch section, press stud closure
Ravelryed: here

press stud

These were very quick to make and a good use of leftover grey yarn. Small modifications were made to the number of stitches cast on and rows worked because I used 8ply instead of the recommended worsted weight. After a small amount of market research, I opted to use a press stud as the closure rather than a button hole. According to a friend with an almost 2 year old, a buttonhole closure might prove a bit fiddly. It looked a bit plain with the hidden press stud, so a button was added for purely decorative purposes. I did toy with making some bibs using the yellow cotton, but decided pretty quickly that it wasn’t nearly as practical a colour as the grey.

It was quite a relief to get something, no matter how small, finished. It felt like quite a while since I’d triumphantly snipped off the last woven in end of a project!

Gift

In a recent phone conversation with my sister, the topic of belated birthday presents for one another came up. My sister mentioned that she’d better finish my present off so she could give it to me when I saw her next. My curiosity was piqued by the use of the word ‘finish’ but I tried not to read too much into it. On the weekend I saw my sister, and the present exchange occurred. The little mite had knit me a scarf!

Lovely Scarf

Not just any scarf, but a lovely feather and fan scarf. I’m immensely proud of her — she did a fantastic job, and the yarn she used (Sublime, she tells me) is so soft and warm. I’m not sure if it comes up in the photo but it’s a bit crinkled because the weather’s been cold enough for me to wear it.

Something that the photo hasn’t quite picked up is the colour of the yarn. It’s a bit greener than the photo makes out. A light duck egg blue, I guess is the most apt description.

The owl buttons are a really nice touch too. The white goes well with the light duck egg blue and I’m such a sucker for owly things so she must have known she was on a winner by putting them on.

I don’t know if you read this blog, but thank you little sister, I love my new scarf to bits.

Once, twice, three times a beanie (aka Goldilocks and the three beanies)

A little while ago, I decided to knit a beanie as a gift for a friend. I had a hat’s worth of yarn in stash in a colour that suits her very well, so it seemed that fate had intervened and the project was obviously meant to be.

Initially I cast on for Porom. The twists looked a bit puffy, but mostly it looked good. That is, until I finished it and blocked it. What was once a nicely-sized slouchy beanie had turned into a perfectly good shopping bag, without handles.

Slightly disillusioned but as stubborn as ever, I ripped it back and reused the yarn in an Icing Swirl Hat. It soon became apparent that it was far too small. So again I ripped the hat back, and soaked the kinks out of yarn. The yarn was starting to lose its structural integrity by this stage, and my disillusionment was starting to grow. As was my stubbornness, for that matter.

I don’t have photographic evidence of either of those mishaps, which is quite fortunate as it means I’ll most likely remember that yarn as this beanie:

Anna

Anna Karenina by Veruschka Babuschka
Not very much Bendigo Woollen Mills Luxury 8ply, Cream
2.75mm and 3.25mm needles
Start: August 2010
Finish: August 2010
Modifications: different yarn
Ravelryed: here

The pattern hadn’t been long published when I knit this beanie up. It was a nice easy knit, with just enough variation to make it interesting. Having two beanie failures ended up being a blessing in disguise — of the three patterns, I think this one turned out the best and I’m really pleased with it.

Anna close up

This isn’t the first time I’ve used Luxury, but I must admit I’m a bit frustrated with it. While it’s a lovely soft yarn and comes in quite a few nice colours, it drops quite a lot after its first watch (see Porom). Sadly, I don’t think this is an uncommon problem. I had been planning to make a few bigger things using Luxury 4ply, but I am now a bit Luxury-shy.

Who would have thought all of this was down to not swatching? I tend to swatch for larger garments, but take for granted that for something relatively small, like a hat, would be ok without a test swatch. I have learnt my lesson.

Colouring with thread

It was lovely to read everyone’s comments about my Derwents, it’s nice to know that their popularity wasn’t confined to just my primary and high schools.

The Derwents were used to plan out my latest graphic design assignment: an A3 poster based on a song lyric of my choosing. I’m fairly inept at both drawing and using image editors so I had to be a bit creative in how I produced the poster. Luckily, I recently came across a lovely cross stitch blog, and had been thinking about doing some cross stitch. So, it was decided that cross stitch would be a good way to avoid drawing and image editing software.

Armed with grid paper, coloured pencils and youthful enthusiasm, I put together a pattern based on a cross stitch border found on etsy, vintage transfers found on Flickr and a particularly uplifting lyric from Morrissey. A week and a half later and with slightly less youthful enthusiasm, I had cross stitched this:

poster full

To save my sanity somewhat, the cross stitch is around A4 size, half the required size. Through the magic of scanners, I then made it A3. Although some of the texture is lost through scanning, it works surprisingly well as a paper poster. I won’t bother posting the scanned version of it, as it more or less looks the same as the photo.

For those playing at home, the lyric is from How Soon Is Now? by The Smiths. My Dad seemed a bit dismayed when he saw the cross stitch today; I’m not sure he understood why I went to all the effort of cross stitching something so depressing. To me, that’s the point of it — dainty is often associated with pretty or positive things, when it doesn’t necessarily need to be that way.

Prior to this assignment, I had only attempted cross stitch once when I was ten. My auntie helped me to make a couple of book marks for my parents which I think worked out ok, if not a little wonky. There’s still a fair bit of wonk to this piece, but I don’t think it would be as good if it was perfect.

poster border

Irrespective of the mark I get for the assignment, I’m really proud of this work. It’s not often I look at things I’ve made with a sense of pride. I’m often happy or satisfied with a knitting project or other non-crafty pieces of work, but pride is just that step further. The trick will now be to make sure I keep doing things that I feel proud about.

The sea the sea, the stockingette sea

A more organised blogger might have a few blog post ideas squirrelled away for times where there’s not much to blog about. Sadly, I’m a fairly disorganised blogger, so I’ve let the blog go fallow again. I have been busy knitting while I’ve been away though.

Grandfather vest, finished

Grandfather Vest by Veronik Avery
1.25 balls Bendigo Woollen Mills Classic 8ply, Anthracite
4.50mm needles
Start: August 2010
Finish: September 2010
Modifications: different yarn, and that’s it!
Ravelryed: here

As soon as I saw this vest, I knew I had to buy the book that it’s from, Knitting 24/7. It’s a book that’s full of good staples like scarves, jumpers, shawls and socks, so although I primarily bought it for the vest pattern, there are enough interesting patterns to make it a good buy (especially if purchased via the wonderful Booko).

The vest pattern is very straightforward as it’s knit in the round up to the armholes. I think that’s the reason why its completion snuck up on me — it’s very easy to get into a trance-like state knitting stocking stitch in the round. Before you know it you’re staring at a pretty much completed vest that just needs buttons sewn on to be done and dusted.

green buttons

I was originally planning to use a pair of lovely green glass buttons that I received for my birthday last year. However, while in my trance-like state, I decided that the grey/brown fabric and the green weren’t meant to be together. This left me in a slight state of indecision as I hadn’t considered any other yarn/button pairing, but then these grey buttons jumped out at me as I was sifting through my button collection:

grey buttons

The yarn used was probably the oldest yarn I had stashed away, so it fit in nicely with the ‘first in, first out’ stash theory. It was purchased in either 2004 and 2005, and was leftover from a hat and scarf I knit for a friend. While it’s a good policy to make sure there’s more than enough yarn to cover the project you’re working on, my aversion to running out of yarn resulted in my having around 400 grams extra, which is a tad excessive. Having said that, these leftovers have given me a very wearable item of clothing, so my whinging is minimal.

The colourway, Anthracite, is a bit of a strange one. Under some light it looks quite grey, and in others, very brown. I think it’s a colour that was produced for only one or two seasons which is understandable — it was very hard to get a good idea of what the colour was like from just the shade card.

I’m a little disappointed with the fabric I produced with this yarn, as it’s a bit uneven in places even after blocking. I’ve used Classic 8ply before and gotten very neat results so I’m at at bit of a loss to explain why it’s not so good this time round. Hopefully it’ll even up as I wash and wear it.

It seems my trance-like state was very productive, for as I was creating round after round of stocking stitch, I decided to make the cabled jumper for Matt rather than the striped raglan. As much as stocking stitch makes for good commute projects, I found myself wishing for something a bit different. Something with cables should scratch that itch, even if it flies in the face of ‘first in, first out’.