Archive for the ‘Finished objects’ Category

The Jan Sweater

Marsha Marsha Marsha

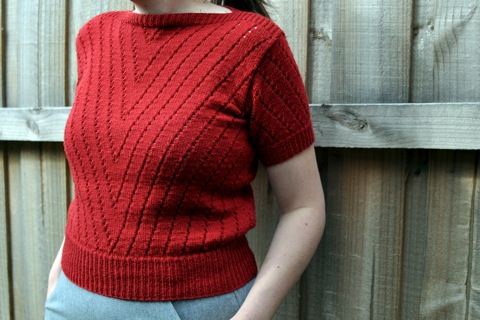
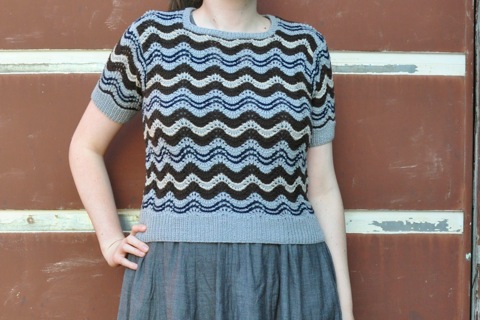
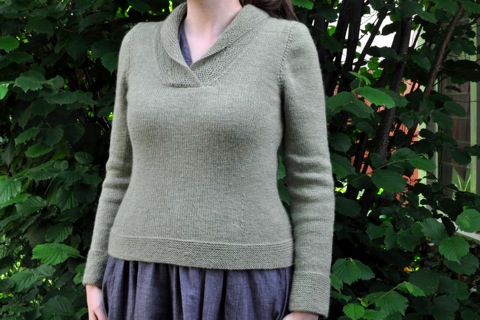
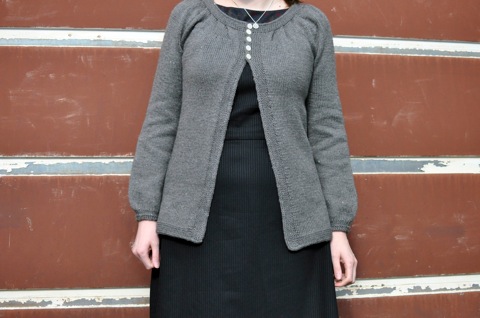
The Jan Sweater from A Stitch in Time, Volume 2
Yarn: Bendigo Woollen Mills Luxury 4ply, Brick
Needles: 2.75mm and 3.25mm
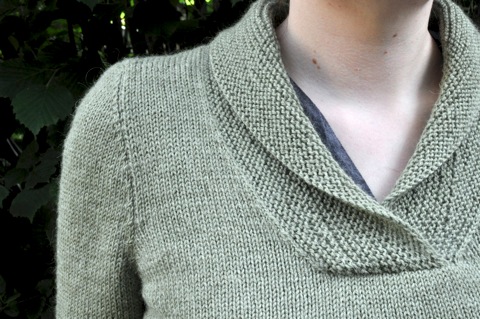
Modifications: Made the body longer, sewed up the neck to make the neck opening smaller
Started: February 2012
Finished: April 2012
Ravelryed: here

If you are contemplating knitting this jumper, stop what you’re doing and cast on. It’s an easy, but fun, pattern and it makes a lovely top. I really enjoyed making it, and since finishing it a week ago, I’ve worn it a couple of times. It’s the first pattern I’ve made from the Stitch in Time series (despite buying the first volume nearly three years ago) and I’m simultaneously impressed and kicking myself for not starting on patterns from the books earlier.

substantial shoulder seam

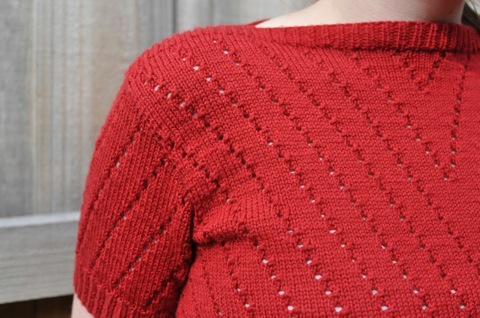
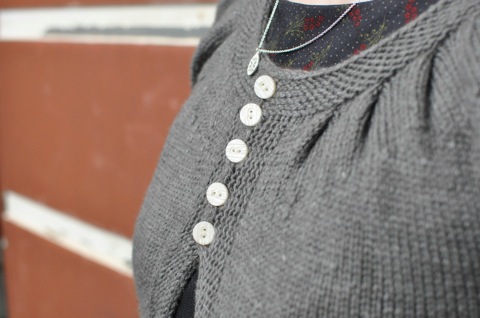
The usual modification of lengthening the body applied to this pattern. The other modification was to make the neck opening substantially smaller (by about 10cm on each side). I think this makes the top more casual than if the neck was left completely open, but I feel more comfortable with my shoulders covered up.

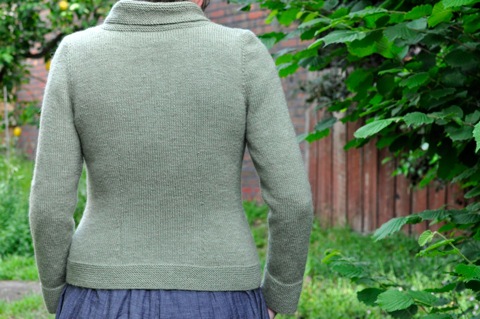
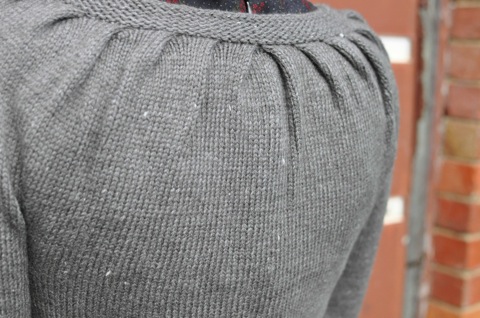
While seaming it up, I started to become concerned about the blousing above the ribbing. During a mid-seaming try-on session, the blousiness was creating doubt about whether this top was going to work for my body shape. However, as soon as the sleeves were set, it all balanced out and order was restored to the world.

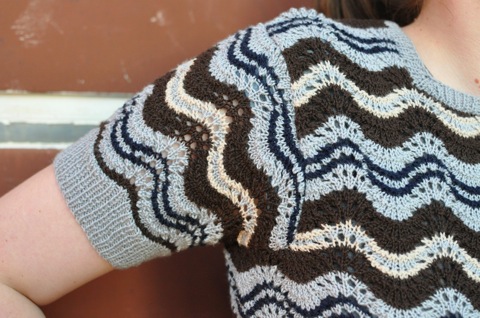
As a side note, I should point out that for the size I made, the 34-36 inch, the sleeve cap only just stretches enough to fit in the armhole. I found there was little room for seaming error, but it looks fine when the sleeve’s set, and doesn’t feel tight or uncomfortable when worn.

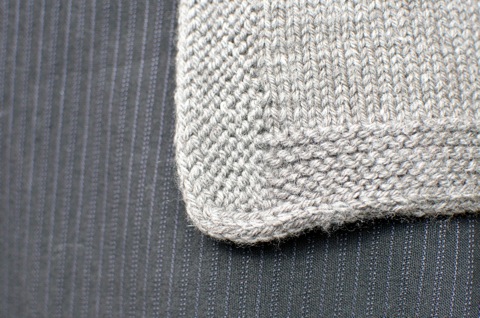
This project was not my first experience with Bendigo Woollen Mills’ Luxury, but it was the first time I’d used the 4ply version. It doesn’t seem logical that the difference between the two weights would be substantial, but I much preferred working with 4ply Luxury than 8ply Luxury. It’s soft, but feels fairly hard-wearing. I definitely want to use it again, and it makes me feel even sadder that I missed out on buying some Oceanic before it was discontinued.

It would probably make sense to use this momentum to cast on another vintage project or another project using Luxury 4ply. However, I’m going to do something a bit different; I’m going to be sensible and continue to finish off WIPs that really should have been finished a long time ago. Little by little, I’m becoming a somewhat responsible grown up.

Wavy Line

Wavy Line, finished

Wavy Line Sweater by Sarah Dallas
Around 225g Grignasco Bambi in total, using light blue, chocolate brown and cream
3.75mm and 4.5mm needles

Start: April 2011
Finish: March 2012
Modifications: added about half a repeat (20 rows) to the body, adjusted stripes on sleeves to match
Ravelled: here

Huzzah, Wavy Line is finished and I’m pleasantly surprised by how much I like it! It doesn’t feel like it’s been a WIP for nearly a year, but Ravelry says I started it in April 2011, so it must be so. It was one of those projects that I worked on in dribs and drabs; projects that use four colours aren’t particularly conducive to commute knitting so it had to stay at home for the most part.

Over the last few years, I’ve managed to collect quite a few different colours of Grignasco Bambi. This pattern was a good way to put a dent in the collection. It took a bit of mixing and matching to come up with a combination of four colours that weren’t too loud, but I think I succeeded.

One of the drawbacks of using four colours in a pattern is all the ends it generates. I know I made work for myself by only carrying the two main colours, light blue and chocolate brown, up the side, but I felt that carrying all four colours could affect the tension on one side and make it a bit bulky. These are only some of the ends that needed to be woven in:

ends

I didn’t keep a count of how many ends there were in total and I’m glad I didn’t. If I’d known how many ends needed to be woven in before I started, it’d probably still be unfinished. Sometimes it’s best just not to know.

wavy with skirt

The fit is a bit different to what I expected but I’m still happy with it. As I was knitting it up, I imagined wearing it with pencil skirts, but now that it’s finished and gone through the process of being tried on with other things from my wardrobe, I think it looks better with A-line and fuller skirts. The fit around the armpits is a little funny because of the unusual construction of the sleeves and armscyes. There is only a little bit of shaping at the very top of the sleeve and all armhole stitches are cast off in one lot, rather than gradually. This construction made setting the sleeves really easy, but the fit was probably not as good as a more traditional set in sleeve.

sleeve construction

If you are considering knitting this pattern, I highly recommend checking out this great post comparing the two patterns. It gives a really good rundown of the pros and cons of each pattern. For what it’s worth, I found the Sarah Dallas Vintage Knits version of this pattern pretty clear and easy to follow. It had a pretty big drawback in that the pattern only came in one size, but luckily it was the right size for me. It wasn’t the most enjoyable project I’ve worked on, but I’m pretty happy with the result and I can move onto another WIP that’s been kicking around for far too long…

A wee vest for a wee girl.

I often wonder whether there’s a use by date for writing about ‘new’ FOs. For example, the vest mentioned in this post was finished in mid January. Now that it’s March, it feels strange to be writing about the vest, particularly when there was nothing stopping me from writing about it back in January (unlike Manu, where it was a gift that I needed to keep quiet about). I guess the moral of the story is to blog more often so I don’t have to ponder these things. Anyway, here’s a new/not really that old FO:

Baby Vest

Tummy Warmer by Angela Tong
175ish grams Bendigo Woollen Mills Luxury 8ply, pink
3.75mm and 4.5mm needles

Start: January 2012
Finish: January 2012
Ravelled: here

In January a friend of mine had a baby girl. To celebrate this occasion, I wanted to knit a little something for the baby. Although I have knit a couple of things for babies in the past, I’m not really attuned to the patterns that are out there, so when I started looking at baby patterns this time round, the selection was slightly overwhelming. After some deliberation, I finally settled on Tummy Warmer from Petite Purls. As an aside, if you’re in the market for babies’ and/or kids’ knitting patterns, I recommend checking out Petite Purls, there’s some cute stuff there.

Knitting in pink feels a bit foreign to me. To be honest, knitting anything that isn’t grey, blue, red or brown feels a bit strange. What is probably even more strange is the fact that I had pink yarn in my stash. It was left over from my ‘selling knits at craft markets’ experiment, and even though it was a heavier weight than what was called for in the pattern, I thought it would work well as a nice warm vest. As it turns out, I made the 3-6 month size with no alterations to the stitch or row count, and the vest came out with more or less the same measurements as it would have been using a 5 ply. It’s definitely too big for her now, but I’m hoping that when the consistently cooler weather comes, it’ll be the right size.

The honeycomb stitch used for the body of the vest makes it thick and warm, and adds a nice bit of texture. However, I found it a pretty tedious to work up. The yarn and needle combination just didn’t seem to suit the stitch pattern; whenever I had to knit into the front of the stitch, I needed at least two attempts to get the needle through cleanly. I suspect that the relatively unpointy needle, the looser twist on the yarn and the tight twisted stitch created a perfect split stitch storm. If I hadn’t been so good at splitting stitches, I think it would have been an even quicker knit than it was.

My favourite part of the vest are the buttons. They’re not necessarily the world’s prettiest buttons, but they do suit the vest well. The thing that makes them my favourite part is the fact I accidentally happened across them during the Pransell Declutterathon 2012™. I have no idea when or why I bought them, but I had exactly the number of buttons I needed, they were exactly the size I needed and they matched the vest. Serendipity.

vest buttons

It’s really quite a cute little vest, and these photos don’t do it justice (my age old excuse for not taking good photos of something). I find taking photos of baby items quite difficult, as I don’t have a small person to model them for me, and I’m not a fan of using dolls or soft toys as models. I could possibly go down the Posie Gets Cozy route and use a little person’s clothes hanger… Any suggestions would be gratefully received, as I highly doubt this will be the last time I knit an item of clothing for a baby.

If you are looking for a little vest to make for a little person, it’s worth considering this pattern. It’s quick to knit up and the honeycomb stitch means that it’s not boring (although I do suggest avoiding non-pointy needles and yarn that splits easily). It’s been a little while since finishing it, but from what I remember the pattern is easy to follow. It’s a winner.

Faux FO

Over the Christmas break, I borrowed my sister’s Manu and added pockets to it. It was one of those projects that wasn’t particularly involved, but it was one where I got to a certain point and thought ‘oh, I can’t be bothered with this right now’ and left it for a week (or two or three).

The sticking point was seaming the sides of the pocket flaps to the cardigan. It wasn’t a difficult job, I just couldn’t be bothered dealing with the rigmarole of getting the pockets lined up. Once I got my motivation back, otherwise known as ‘I’m going to see my sister in a couple of days so I’d better get a move on’, it didn’t take long to do at all.

My opinion of the pockets is not relevant, given it’s my sister’s cardigan, but I’m going to give it anyway. Sadly, I think they muck up the line of the cardigan, and detract from its nice simple lines and details. When I have my hands in the pockets it doesn’t look too bad:

hands in pockets

But the pockets sans hands don’t really appeal to me at all.

pockets san hands

A lot of this has to to with the yarn I used. Pear Tree 8ply is 100% wool and doesn’t have much drape. A drapey yarn is recommended in the pattern. While the more ‘structured’ yarn, for want of a better adjective, worked well for the cardigan itself, it just doesn’t suit the pockets that well. It bulges where a yarn with more drape wouldn’t.

I am a bit disappointed, though not surprised, by the outcome. However, my Mum reports that she often sees my sister wearing it, so if the recipient is happy, then I am happy. Mostly.

First

The first post for the year is about my first finished object for 2012. It also happens to be Matt’s first pair of hand knitted socks and the first Nancy Bush sock pattern that I’ve finished.

socks!

Oak Ribbed Socks by Nancy Bush, from Knitting Vintage Socks
MadelineTosh Tosh Sock, Twig
2.5mm dpns
Modifications: Lengthened the feet

Start: November 2011
Finish: January 2012
Ravelled: here

So far in my knitting career my Mum, Dad, sister have all received socks made by my hands. Although Matt didn’t let on, I suspected that he was feeling a bit left out. These socks were part of his birthday present for this year, and I think they were a success.

There was a bit of trial and error involved in making these socks. Initially I cast on the Yarrow Rib Socks from Knitting Vintage Socks using 2.75mm dpns because that was the size I had and the swatch was to gauge. The fabric was looking a bit loose, so I had some concerns that they wouldn’t wear that well. After seeking advice from Twitter and SnB, they were frogged and I started again using smaller needles and the Oak Ribbed Sock pattern. As it happened there was a bit of frogging going on at that SnB meet up, as a friend was frogging a pair of socks that were knit up on 2.5mm Knitpro dpns, and the resulting fabric was so firm it could have stopped bullets. Bulletproof socks were apparently not the goal, so the 2.5mm dpns were kindly leant to me.

This was my first opportunity to try Knitpro/Knit Picks/whatever they’re called at the moment needles. Although there’s little risk of metal dpns breaking, I’ve been put off buying or trying Knitpro needles because of the broken circulars I’ve seen or heard about. After knitting one of the socks, I went out and bought myself a set of metal 2.5mm dpns. They feel nice and solid in my hands, have a decent point and are a good weight for me. I’m unlikely to move away from my circular needles of choice, Addi turbos, but I’d definitely consider buying more Knitpro metal dpns in the future.

Tosh Sock is a great yarn to work with, and although it softened up a lot after blocking, I think it’ll wear really well. The colour way, twig, caused me a few headaches though. It’s lovely in the skein, but even fairly basic patterns kept getting lost in the mix of light and dark brown. Before making these socks, I started a Shaelyn Shawl and swatched for A Thousand Splendid Suns, but it just wasn’t working out. Even with this sock pattern there’s a bit of pooling, but I think it works well enough and Matt is happy. Before casting these socks on I bought another skein of MadTosh Sock but in Graphite. There seems to be less variegation in that colour way so hopefully finding a pattern to go with the yarn will be easier.

Heels!

I’m very slow on the Nancy Bush sock pattern uptake, so the next paragraph or so will be nothing groundbreaking for anyone else who has used a knitting pattern by Nancy Bush. I remember borrowing Knitting Vintage Socks from the library not long after it was released and was impressed not just by the patterns, but by the sections at the front about the different kinds of heel and toe. Even though Oak Ribbed Socks are just ribbed socks, but little things like the rib ‘seam’ to the bottom of the heel, the welsh heel and the three point star toe made it a fun knit.

toe!

These were meant to be finished in time for Matt’s birthday. They were finished the night of his birthday so I was kind of on time and also kind of late. Irrespective of whether they were technically on time, they’re done, he seems to like them, and I don’t think they’ll be the last pair of hand knit socks he’ll get.

(joyful and) Triumphant

DSC 0372

Cornsilk Pullover by Amy Herzog
5ply yarn from the Bendigo Woollen Mills bargain room, avocado
3.75mm needles
Modifications: Combined two sizes, lengthened the arms

Start: July 2011
Finish: November 2011
Ravelled: here

Besides blocking, it’s finished and I’m very happy with it! Look at the back, it fits like a glove!

DSC 0382

I actually finished it on Monday night. The seaming took a lot less time than expected, which I can only put down to my cheer squad (thanks DrK!). The sleeves are a bit bumpy in places but I think it’ll be fine once I’ve given it a wash.

This is the first Amy Herzog pattern I’ve knit, and I’m impressed. The pattern was pretty clear, and the result is pretty pleasing. To fit with my body shape, I combined the bottom half of the 38 inch size and the top half of the 36 inch size. To make them fit together I rejigged the waist decreases a little bit, and seemed to work quite well.

This jumper was more or less knit in tandem with my sister’s Manu. Working with this yarn was like working with jute in comparison to the Pear Tree I made Manu from. However, it didn’t seem too bad once I’d finished with the Pear Tree and was working almost solely on this jumper. There seem to be a lot of guard hairs in this yarn which are probably the source of its jute-like texture. While I’m happy enough with the fabric, I’m not sure I’d buy this yarn again if the opportunity arose (unlikely, as it was purchased a long time ago from the Bendigo Woollen Mills bargain room). It just happened to be in my stash, it was the right gauge and there was a jumper’s worth.

DSC 0361

Using slightly dodgy yarn for the sake of using it up probably isn’t the best approach to knitting with stash. However, I tend to be a bit of a bad weather friend to my yarn, sticking with it until I’ve found a use for it. That’s not to say I don’t destash, but the process of letting my yarn go can be a bit more difficult than it should be.

The yarn was originally purchased to be used for my colour work vest. I evidently wasn’t very good at judging how much yarn I needed, because there was enough left over from the vest to make this jumper and there is still a fair bit left. It was also purchased during a brown and green phase, which has now morphed into a brown, grey, blue and red phase. I contemplated overdyeing it after finishing, but I’ve thought of two skirts and one dress I can wear it with, so light green it shall stay for the time being.

Almost as exciting as actually finishing something is the fact that it was cool enough today for me to wear it to work. To be honest, it could have been in the high 30s like it has been in other parts of the country of late and I would have still worn it. I wasn’t going to let a little thing like heatstroke get me down.

Unsecret Squirrel

Manu

Manu by Kate Davies
Around 700g Pear Tree 8 ply, grey
3.5mm, 3.75mm and 4.5mm needles
Modifications: Lengthened the sleeves and the body, mirrored the pleats

Start: July 2011
Finish (sort of): September 2011
Ravelled: here

It’s been over a month since finishing it, but I gave it to my little sister only recently. When she unwrapped her cardi she cheekily exclaimed ‘about time!’, as she’s been asking (in the form of whinging) for a jumper or cardigan from me for a while. As soon as it was unwrapped, she put it straight on and seemed pretty happy with it. Lucky for her.

buttons

The best part of this pattern is the little details; the icord cast on and bind off, the pleats and the sweet icord buttonholes give the cardigan polish. It’s those details that made the acres of stockinette stitch worth it.

icord

There were only three minor modifications that I made to the pattern. The first two were to lengthen the body and sleeves, based on the measurements on a cardigan my sister often wears. The other modification was to mirror half of the pleats, which I did after seeing a few versions on Ravelry with that modification. The cardigan just seems to look more balanced in comparison with the having all the pleats facing the same way. It was lucky that the size I made had an even number of pleats, because I’m not sure how I would have dealt with mirroring an odd number of pleats.

Pleats

After the little yarn hiccup at the start of the project, it was a joy to work with. Lovely and soft, a few lighter nubs for variation and the fabric had a lovely halo. It looks like I might be able to make something small for myself with the leftovers, but that does little to deal with the nagging feeling that I’ll never be able to get that yarn for such a good deal again.

Even though I’m calling it finished it’s not really. When I gave it to my sister, I mentioned that she could have pockets on it if she wanted. Her response was ‘I like pockets’ which more or less translates to ‘I would really like it if you added pockets to this cardigan, dear sister’. Pockets she will have, but only after I manage to get the cardigan from her. I predict it will be officially finished in July 2023.

Ricking and a’racking

Kalajoki from the front

Kalajoki Socks by Tiina Seppälä (rav link)
4.5 balls Patons Patonyle 8ply, red
3.25mm DPNs
Start: June 2011
Finish: July 2011
Modifications: see below
Ravelryed: here

It may not seem like it, given how close this post is to the start of the Sheep and Wool Show, but I finished my Kalajokis with plenty of time to spare. Sadly the weather gods have not been smiling upon me lately, so I’ve had to wait for half-way suitable photo weather, before writing this post.

The biggest modification made to the pattern was to make the socks knee-length rather than calf-length. If you’re interested in making knee length ones yourself, these are the modifications I made:

  • Cast on 74 stitches rather than the 54 given in the pattern.
  • Knit 14 rows of twisted rib for the cuff, rather than 10 rows given in the pattern.
  • Starting with the first row after the ribbing, I decreased 2 stitches every 5 rows 10 times (54 stitches remaining).
  • Knit around about 2.5 repeats of the river ribbing for the leg, rather than the 1.5 repeats (give or take) given in the pattern.

Kalajoki, meet fence

The calf shaping is pretty crude, particularly when compared with the shaping used in the Delicious Knee Sock pattern. That said, the socks seem to stay up and it looks fine, which is all that matters really.

It was a really enjoyable pattern to knit; not something that I could work on without concentrating on it a little, but still simple enough to take along to a Stitch n Bitch. The rib snaking down the side of the socks is really striking and reminds me of ric rac a little bit. Not sure if anyone else sees that though…

The Patonyle 8ply I used makes for a lovely soft and warm fabric. Sadly, it also made for a sock that is too thick to fit in my everyday boots which is a bit of an issue. However, I do have a backup plan so I should still be able to wear them this weekend.

In my excitement about getting the socks finished in time for Bendigo, I completely forgot to think about the knitting that I should take with me and don’t have anything suitable on the needles. Such a rookie mistake! The current frontrunner is a Turn A Square for Matt using leftovers from my stripy knee high socks (he’s brought me enough cups of tea to warrant a beanie), but I cannot rule out a last minute change to the lineup…

Delicious Striped Socks

striped socks

Delicious Knee Socks by Laura Chau
0.7 ball Noro Kureyon Sock, S149
0.7 skein SweetGeorgia Yarns Tough Love Sock, Espresso
2.25mm DPNs
Start: April 2011
Finish: June 2011
Modifications: no slipped stitch or cabled seam
Ravelryed: here

During the week I finished these socks. As mentioned in an earlier post about them, these are the first socks I’ve knit for myself and I’m smitten. The two yarns worked really well together and they are so warm, perfect for this time of year.

Working on the cuff in only Tough Love Sock meant that I got a bit more of a feel for the yarn, and I quite like it. The nylon content (20 per cent) makes it a wee bit squeaky, but it feels very hard wearing and I’m still completely enamoured with the espresso colourway.

There’s quite a bit of both yarns left over, so Matt may score a thin version of Turn A Square to wear under his bike helmet. But only if he’s good and keeps bringing me cups of tea after dinner.

striped toes

Another thing mentioned in a previous post was the pattern, and I still stand by what I said then; it’s a really good pattern and highly recommended it if you’re planning to make knee socks. Actually, the only thing I should mention is that the pattern has a short row heel. While that means you get a nice contrast heel, I’m not sure if I like how the short row heel turns out when you pick up the wrapped and double wrapped stitches. Are they any other forms of construction where you can get that kind of contrast heel? I’m pretty much a beginner when it comes to sock construction so I don’t really know… The heel aside, I’m contemplating making a non-striped pair of these in grey, and with the cabled seam variation given in the pattern. And maybe the over the knee version rather than just below the knee.

Finishing these socks means that the red knee sock challenge has commenced. I cast on the first sock on Monday, and I’ve now finished the leg and am onto the heel. Given it’s now just shy of a month before the Sheep and Wool Show, I think they might just be finished in time. Famous last words.

Lyttelton

Lyttelton by Kate Davies
5.5 balls of Rowan Cotton Glace, Mystic
3.00mm and 3.25mm needles
Start: January 2011
Finish: March 2011
Modifications: heavier-weight yarn, larger needles, smaller size
Ravelryed: here

The yarn I used was a 5ply rather than the recommended 4ply, so I ended up making it extra small width-wise, and medium length-wise. There’s not actually an extra small listed in the pattern; I just made the smallest size, less one repeat.

As with the cowl, I was fairly staunchly anti-shrug, but there are shrugs and there are shrugs. Lyttelton’s probably a bit longer than your average shrug, so lets just say it’s more of a bolero. I had some fairly well documented teething problems with the pattern, but this was due to my ineptitude rather than the pattern. I’m sure I’ve mentioned this before, but once again just for my sake, it helps a lot if you read the pattern.

Once in the groove, I really enjoyed knitting it. One of the things that helped the enjoyment was cabling without a cable needle. If you haven’t tried it, I highly recommend taking a look at Grumperina’s tutorial. I think it saves time, and is a lot less fiddly.

Lyttelton is the first Kate Davies pattern I’ve made, and I’ll be definitely making other designs from her in the future. On a slight tangent, Kate’s latest cardigan pattern, Deco, is due for release in the next couple of days. Although I don’t have any suitable yarn for it in my stash, I’m really looking forward to its release. I’ll definitely be making one for myself.

Back to Lyttelton:

I bought this cotton when I was a uni student. I remember marvelling at it when it arrived in the mail, as it was probably the most expensive yarn I had bought up until that point. It was purchased specifically for the Lace Camisole, the cover pattern from Sarah Dallas’ Vintage Knits. However, before I cast on, I searched knitting blogs to find out how other knitters found the pattern (remember the days before Ravelry? yeah, it’s a bit hazy for me too). The reviews were not altogether positive, so the yarn languished in my stash. Lyttelton is probably better suited to a wool or a wool blend, but the grey cotton goes with a few things in my wardrobe, and I was keen to use the yarn up.

As it turns out, I didn’t quite have enough yarn for Lyttelton. As the colourway had been discontinued years ago, I put out a call on Ravelry for scraps (before Ravelry, how did people find just that last little bit of yarn they needed to finish? I don’t know either). Luckily, someone very generously helped me out, and I was able to finish it. It’s nice to see yarn that’s been in my stash for so long transformed into a finished item.

I should mention that much to my great annoyance, one of the balls I used had two knots in it. Usually I can handle the occasional knot, but two knots in just over 100 metres is quite frustrating. It was particularly frustrating because I knew I was running short so every centimetre of yarn counted, and I find weaving in ends of cotton yarn particularly tedious. As mentioned before, the colour was long discontinued so there was no point complaining to Rowan about it; I could whinge to myself and whinge to Matt, but ultimately I just had to put up with it.

So far I’ve only worn Lyttelton long enough to have photos taken. Currently it sits in my wardrobe, waiting for a warm enough day to be worn. Maybe that day will be soon?