Podstermatic

Matt’s fingers have been suffering this winter. While I’ve been getting by just fine with my Herringbone Mittens, Matt’s gloves gave up the ghost in Japan. In their stead, he’s been trying to survive with a pair of fingerless mitts I made for him in 2006. Fingerless mitts seem to be fine when it is barely cold, but as soon as the weather even marginally resembles Winter, they are completely insufficient.

Matt's old mitts

He was well overdue for a pair of knitted gloves, particularly because I’d promised to make him a pair after I made my Dad a pair of Knucks a few years ago. In what can only be described as perfect timing, just as I was starting to look for glove patterns, Ozknitter pointed me in the direction of a nifty mitten pattern that would do the trick.

Presto
Matt's mitts down

Chango!
Matt's mitts up

Podster Gloves by Glenna C.
Sock yarn from the Bendigo Woollen Mills bargain room (equivalent to Heirloom Argyle)
2.75mm needles
Start: July 2010
Finish: July 2010
Modifications: different yarn, larger needles, added rows to the thumb gusset
Ravelryed: here

The largest size offered by the pattern were for small mens’ hands, so I used 2.75mm rather than 2.5mm needles and added two more rounds to the thumb gusset. With these modifications, they fit pretty well.

podster thumb

By far the best part of this pattern is the podster thumb. It has a little flap so he can flick his thumb out and use his iPhone (iPhone touch screens are unresponsive to gloved fingers). The pattern calls for part of the flap to be knit separately and then attached to the thumb, but was a little unclear about how to sew it down. I ended up using a whip stitch which probably wasn’t the best option, but it’s pretty secure and the dark yarn hides a multitude of sins. The long cuff is also really good, and can be easily tucked under jumpers or jackets.

So far, they’ve been worn nearly every day since I snipped the last end off. Nothing says success than that.

Where are they now? – Early knits edition

Like many people, it was my Mumma (Grandmother) who taught me how to knit. I think I was around five or six when she taught me how to cable cast on, the knit stitch and to cast off. I liked knitting, but was never really that committed to it as there were toys to play with, trees to climb, books to read, and most importantly, my parents to annoy. I don’t particularly remember any of my really early knits, besides a garter stitch scarf for my Dad. I was knitting massive 32 stitch rows and when I ran out of navy wool, I simply switched to black wool. It was never finished, and I suspect Dad’s quietly pleased he never had to wear a rough garter stitch scarf with blocks of navy blue and black.

A few years later, the Country Women’s Association visited my primary school and taught the grade five and six students to knit. So, the three grade five and six students (I went to a very small school in the country) filed into the staff room and were given brown paper shopping bags. In the shopping bags, there were a pair of needles (4mm if I remember correctly), yarn (Cleckheaton Country I think — it was definitely an Australian Country Spinners yarn), instructions on how to knit, and a pattern for a garter stitch beanie. Because I’d remembered my Mumma’s wise words, I was soon off and away, knitting my first beanie. Except, I wasn’t, and still am not, a hat person. So I made a camera case.

Camera case

When I found it at my parents’ house recently, I was pleasantly surprised by how it looks, over 15 years on. The tension’s a bit off in places and there seems to be a short row in one place, but fabric’s not too bad. The seaming’s a bit rough; it looks like I tried to seam using a kind of mattress stitch, but it’s a bit holey.

Wobbly knitting

I made a drawstring cord and a little loop for the corner using finger knitting. Well, it’s the finger knitting I was taught in school, which resembles single chain crochet. Sadly, the drawstring seems to be missing, but honestly I’m astounded I found the camera case at all.

It’s not a particularly pretty piece of knitting, nor is it something I’ll likely ever use again. However, it’s not something I could bring myself to donate or throw out. It’s a part of my knitting history.

Still

Last night I discovered my table and chair was posted on Design*Sponge, which was not only a lovely surprise, but a nice way to end the working week (thanks for the heads up Debs!). If you’ve moseyed on over here on account of that post, welcome!

It was astutely pointed out last post that the blog has taken quite a sunny turn. So I don’t get people’s hopes up, here’s a dull grey jumper I finished a couple of weeks ago:

Still

Still by Kim Hargreaves
2.75 balls of Bendigo Woollen Mills Boutique, Grey
4.00 and 3.00 mm needless
Start: May 2010
Finish: July 2010
Modifications: different yarn, smaller needles to get gauge (no lengthening required!)
Ravelryed: here

I mean dull in the nicest possible way, because I’m really happy with how this jumper turned out. The length is good, the waist shaping sits nicely and I really like the neckline. I was concerned the gathered sleeves were going to be a bit fussy for my taste, but they seemed to puff out a little less with the yarn I used. This might also be because of the sleeve cuffs, which despite my adherence to the pattern, seem a bit shorter than the version in the book.

Still neckline

The yarn was a limited run that came out a couple of years ago. I bought three balls almost as soon as I saw the shade card, because Bendigo Woollen Mills was, and to a certain extent still is, not known for their greys. I think the colour suits the pattern well, making it a little less girly than the book’s version, which is a pastel pink. The yarn itself is a little rough, making it a wee bit prickly, but nothing I can’t get used to. I have worn it a couple of times and it has started to pill around the sleeve cuffs. It would be preferable if it didn’t pill, but I’m one of those odd people who gets a strange sense of satisfaction from de-pilling, so it doesn’t bother me too much. It’s a jumper that will get a lot of wear.

I enjoyed reading everyone’s thoughts on the value of handcrafts. It’s a recurring issue, but one that I doubt will ever be fully resolved. It is inherently difficult to price handcrafts — as Michelle mentioned, I think there’s a tendency to price goods based on what the seller thinks the buyer will pay, rather than what’s fair compensation for materials and time taken to make the item. I did this myself in my short foray into selling knitted items. Obviously, there is no point pricing something so high that no one will purchase it. However, to me it seems pricing of handcrafts is often based on the price of its substitute, machine-made or mass produced items. Perhaps (re)education is required for both the buyers, in terms of understanding the time required to acquire a skill and produce an item, and the sellers, in terms of valuing their hard-earned skills. Having said all that, it seems like quite an over-simplification for, as mentioned before, quite a vexed issue.

A modest sheep and wool show

Yesterday Matt, Mum, my sister and I went to the Australian Sheep and Wool Show held in Bendigo. It was absolutely freezing yesterday, even with Henry to keep my neck warm, so most of our time was spent in the sheds, with only a cursory glance at the sheepdog trials as we scurried from shed to shed. Like last year, there was a sea of Ravelry badges at the show, but this time I felt a little less intimidated. Perhaps 2011 is the year I’ll actually attend one of the events organised on Ravelry…

We didn’t get the camera out at the show, which is quite fortunate given the battery was pretty much dead when I took this post’s photos this afternoon. I apologise in advance for the photos — it’s a very dull and dreary day making natural light hard to come by.

Jitterbug

Last year, I only bought one skein of yarn. This year, I also bought one skein of yarn. Funnily enough, it was Colinette Jitterbug, the same as last year, but this time in Vincent’s Apron. Vincent’s Apron was the colourway I became enamoured with at the show last year, but I didn’t buy it then because it didn’t fall within my yarn buying policy guidelines (only buy yarn when I know what I’m going to knit with it. It might not make sense, but I’m running with it). However, I could not stop thinking about it. Luckily, this scarf pattern came along, which I thought would look great in Vincent’s Apron. When I got to Sarah Durrant’s stand yesterday, I couldn’t find a skein of it anywhere, bringing on a cold sweat, but fortunately she had some in a tub at the back. So it only took a year of deliberation, but I finally bought the yarn I obsessed over at last year’s show.

circular case

In addition to the single skein of yarn, I purchased a Namaste Circular Case from Stranded in Oz. I wasn’t planning to buy one of these yesterday, but had been looking at them online for a little while. There’s an ongoing battle between me and my circular needles, and up to this point, the circulars have been winning. I’m hoping this piece of modern knitting organisational weaponry will help me overcome my circulars’ tangling and absconding ways.

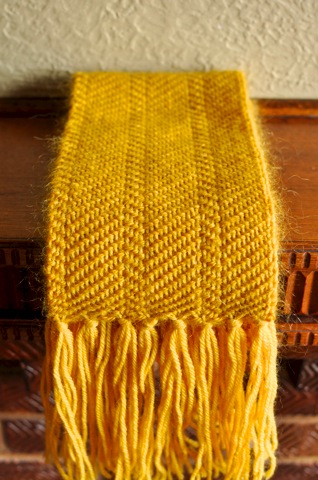
woven scarf.jpg

The last of my purchases was completely on impulse, which is very unusual for me. I bought this beautiful woven scarf from the Bendigo Spinners Weavers and Handcrafts Group’s stand, for the princely sum of $25. It seems to be made from two different types of Bendigo Woollen Mills yarns — Rustic for the warp, and Mohair for the weft. It’s a bit prickly around my neck, so it’ll soon have a conditioner and wool wash bath which will hopefully soften it up. Besides that, I really love it. The colour is great and I like the herringbone weave a lot.

I feel a bit guilty for paying so little for it. Although I have absolutely no experience in weaving, I can’t imagine that $25 is sufficient compensation for the person who made it. Perhaps I should have offered to pay more? It’s quite a vexed issue.

So, there endeth my Sheep and Wool Show wrap up for this year. My purchases were pretty modest and pretty yellow, but I’m really happy with what I brought home.

Sunshiny garden furniture – a DIY tale

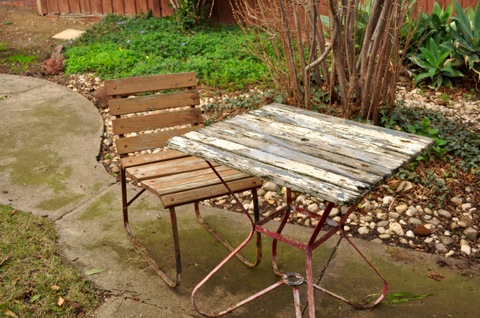
Eleven months ago, we brought home an outdoor table and chair that was in need of a bit of love and attention. I posted a photo of them previously, but here’s a reminder:

table and chair before

With a few repairs courtesy of my Dad and some sandblasting, powder coating, new wood, bolts, paint and a generous dollop of procrastination, the poor old table and chair was new again.

DSC_0014.jpg

I am so so pleased with how they turned out. Initially I had doubts about the yellow we chose, but once assembled, it goes well with the white. The colours we used were Taubmans Yellow Spark and Dulux White on White, both in semi-gloss.

Strangely, the most difficult thing to procure were the bolts. A major Australian hardware chain that is the place to go to for these kind of items only had bolts with the manufacturer’s logo on the dome. This simply would not do, so an extensive search commenced. Finally we found some logo-less bolts at an independent hardware store. They came in a brown paper bag, which made me happier than it probably should.

DSC_0196.jpg

As there’s only one chair and two of us, another one (or two or three) chairs are needed to complete the set. On the upside, there’s more than enough paint left over — the smallest amount of paint we could buy was one litre, which was more than enough, even with multiple coats.

I could really get used to this furniture restoration caper. It seemed to take a lot longer than it should to finish, but I’m so proud of the end result. The perfect christening would be do sit outside in the sunshine with some tea and scones with jam and cream. I might just have to wait a little while longer for that to happen.

Henry Henry

Matt and I are edging ever closer to owning matching tracksuits, now that my version of Henry is finished.

Henry, neckwise

Henry by Mareike Sattler
1.5 skeins of Malabrigo Worsted, Paris Night
5.50 mm circulars
Start: February 2010
Finish: June 2010
Modifications: many, listed in detail below
Ravelryed: here

While doing research into Matt’s Henry, I came across this version and knew that I would have to make a similar one for me. Because I used Malabrigo Worsted, my Henry is a lot thicker, softer and I’d argue warmer than Matt’s. That’s not to say mine is necessarily better than his, it’s just different. A good kind of different.

The pattern calls for three repeats (12 rows in total) for each diagonal section, and seven pattern repeats (the herringbone ‘v’) in total. I opted for two repeats for each diagonal section and four repeats in total. This resulted in a scarf a smidge over 12cm wide, a little bit over half the width prescribed by the pattern. I don’t think a wider scarf would work as well in worsted weight yarn as it would feel a bit too bulky around my neck.

As with Matt’s Henry, I used a cable cast on, but the cast off used for Matt’s — k2tog and slip resulting stitch back to the left needle — didn’t translate well to the heavier yarn. The closest I could get to a matching cast off was to use a modified sewn bind off. The cast on and off don’t match exactly, but I think it’s close enough. If I were to make another Henry, I would definitely swatch the cast on and off, something I neglected to do this time round.

DSC_0122.jpg

Besides the cast on/off issue, the only minor niggle I have is the slight flare at the ends due to a slightly looser tension at the ends of the rows. It’s not too noticeable, and because I wear the scarf under my jacket, the ends aren’t generally visible anyway.

Although a few little issues created frustration at the time, I’m pretty pleased with how this one turned out. The herringbone pattern scales up well, with some minor modifications, and it is so lovely and warm — perfect for the cold weather we’ve been having.

Doubt

It’s always a bit disappointing when a project doesn’t quite turn out as planned, and the reality isn’t nearly as attractive as it was in your mind’s eye. I think it’s even more disappointing when in your mind’s eye, the stash yarn you chose matched the pattern perfectly. Sometimes it is hard to let it go — perhaps the project will magically become better in a couple more rows.

failed Raindance

I have had Raindance queued for a little while now, and had enough yarn leftover from Matt’s Henry to make it (how I had enough yarn leftover from a scarf to make a short sleeve top is a story for another day). Originally I had envisioned it as a nice tweedy top for work but sadly, I think this pattern and yarn just were not meant to be.

Working on it at Stitch n Bitch last night, something about it seemed a little off. The more I thought about it, I realised the yarn just did not work with the pattern. The flecks in the Grignasco Tango I was using just seemed a little too bold for the top — if I used a heathered yarn, or a tweed with more subtle flecks, it would look really good. So, this is the end of this incarnation of Raindance.

Looking at the Tango knitted up, it seems to be more suited to a jumper or a cardigan rather than a tshirt-like top. So, on my decidedly knitting-free commute to work today, I wracked my brains for a different pattern to use with this yarn and I think I have the solution. Pickadilly. I might be pushing my luck, yarn wise, and I’ll have to employ my virtually non-existent crochet skills, and I’ll have to buy more yarn for the edging, but I’m feeling a lot happier about this yarn/pattern match already. Happy enough to give it a fly anyway.

Finally finished

Excluding my Tyrolean Cardigan, it has been over a month since finishing my last knitting project. There’s been lots of knitting going on, but progress has been slow. So, it is with great relief that I present my latest finished project:
Dad's socks 1

Generic toe up sock pattern by Wendy Johnson
75g Bendigo Woollen Mills Classic 8ply, Raven
25g Bendigo Woollen Mills Classic 8ply, Kelp
3.75mm needles
Started: May 2010
Finished: June 2010
Ravelryed: here

As the name suggests, these socks are a belated birthday present for my Dad. Although they are late I am pretty confident he will not mind — he seems to quite like hand knit socks. In fact, this is the fourth pair of socks I have knit for him, the third with this pattern and colour combination.

The previous pairs of Dad socks were knit either using one colour only, or with contrasting ribbing, heels and toes. This time I decided to treat Dad to some stripes, using the spiralling stripe method (Ysolda has a good tutorial here). I quite like this method for knitting stripes in the round as there’s no jog to worry about. However, it did require working with a number of balls of yarn at once, which resulted in some major tangles.

Dad's socks 2

This pattern is my go to for plain socks as it is very straightforward. The yarn makes nice thick socks and has the advantage of knitting up very quickly relative to convetional sock yarn. Based on previous Dad socks, it seems to wear pretty well too. The fabric is probably a bit open, so next time I will use smaller needles.

Dad's socks 3

Speaking of next time, I will have to find a better foot model. There was a little bit of a goldilocks thing going on when I took the photos — Matt’s feet are a smidge too big for the socks and mine a smidge too small. I am sure Dad will appreciate me drawing comparisons between his foot size and a fairy tale character.

Little things: new buttons

I recently bought a new winter coat. The colour, cut and warmness factor were, and still are, all really good, but the buttons weren’t doing it for me. It almost seemed that they were dyed to match the coat, but it didn’t quite work.

So, off came the old buttons, and on went the new ones.

before:
#alttext#

after:
#alttext#

Much better! The buttons are a dark blue acrylic, but have a nice mother of pearl sheen to them. It almost goes without saying these days, but they came from Buttonmania. It’s nice to see how a small change to a garment can make all the difference.

Where are they now? – Tyrolean Cardigan edition

Thank you for the thoughtful comments on the last post. It’s really interesting to read other people’s perspectives on comments, commenting and motivation for blogging. It’s given me a lot to think about.

Changing the subject completely, I’m always interested to see how finished projects fare down the track. Often a project’s blogging life ends soon after the project is finished, which means you don’t know whether the item got much use and what improvements would be made if it was made again. A recent epiphany about a finished project has provided the motivation to start a periodic ‘where are they now?’ series.

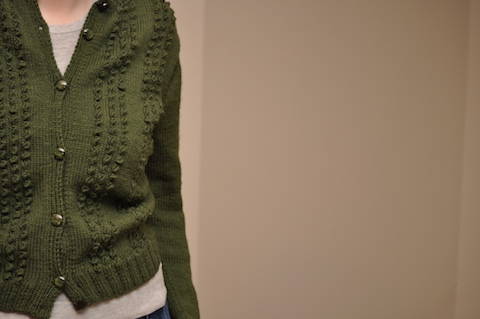
My Tyrolean Cardigan was finished about a year ago, but it’s only been worn a handful of times. I decided that the button band was the reason I wasn’t wearing it very often – I wore it to work recently and found I fiddled with it a lot.

before:

#alttext#

The button band was originally worked as in the pattern – seven buttons, with two spaced close together at the top and bottom. In this configuration, the front gaped a little, even though there was enough fabric to cover me. The buttons at the top and bottom were also largely redundant because I wore the cardigan with only the middle buttons done up, to help it nip in at the waist more.

A few potential solutions came to mind, but I ultimately decided to pull out the button band and start again. This time, I added an extra buttonhole and spaced them out more evenly. This required a bit more surgery than anticipated, as the neckband needed to be reknit as well.

I’m pleased to say it’s a lot more wearable now. It was taken for a test drive yesterday and I didn’t fiddle with it at all! Adding the extra buttonhole made all the difference, which is unsurprising given that the body was knit a bit longer than specified in the pattern.

after: – ravelryed here

#alttext#

As for the rest of the garment, I still really like the bobbles, the colour and the button choice. Being a very warm cardigan, it’s coming into its own now we’re on the Winter side of Autumn. Probably most importantly though, the fabric is holding up ok. There’s a bit of pilling under the arms, but as the rest of the cardigan is remaining pretty much pill-free, I’m reasonably satisfied with how it’s wearing.

The ‘where are they now?’ series is unlikely to feature all of my past knits, as not much interesting stuff can be said about a garter stitch scarf. However, I may be able to slip in a few pre-pransellknit knits that might be a bit more interesting…