Archive for the ‘Finished objects’ Category

Hypnowolf

I am ridiculously excited to have finally finished a project. My last reported project was the draft stopper in September last year, and the lack of finishing has made me a little antsy. Even though I’m not a craft factory and this hobby of mine is not about how quickly I can produce crafty output, it really does feel good, almost triumphant, to say ‘I’m finished!’.

Hypnowolf action shot.jpg

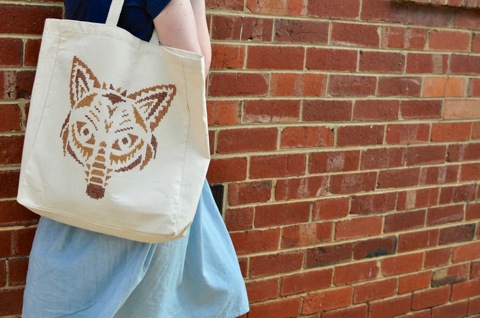
This bag was a lot of fun to make and I’m incredibly pleased with the result. One of the things I liked the most about it was how unfussy it was – the design is asymmetric so it didn’t matter when my stitching became a bit… asymmetric. I also liked that the fabric was thick enough that I didn’t need my embroidery hoop. Even though using an embroidery hoop isn’t that much of a hassle, it was still nice to have one less thing to worry about when working on the bag.

I also liked taking photos of it as I finished with each colour. In my last post, I posted a photo after finishing all the dark brown sections. Here it is after completing the mid brown sections:

Mid brown complete.jpg

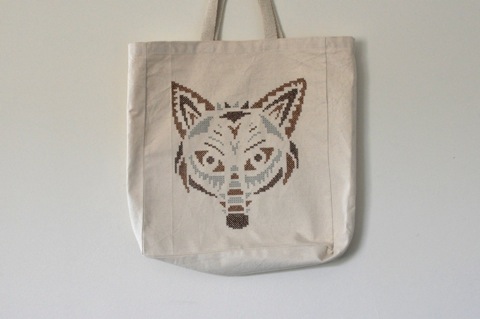
And with the light brown sections completed:

light brown, completed.jpg

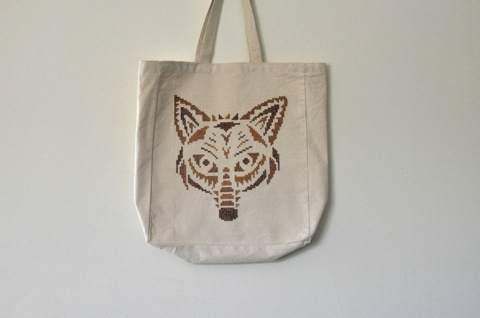
I love how striking the wolf is. Matt thought that it looked a little scary, but I can’t stop looking at it. In fact, I’m considering doing all over again but in a wall hanging. Let’s call it a potential rebound project.

The only area of concern for me was the amount of floss included in the kit. I had plenty of light and dark brown floss left, but I used every last skerrick of the mid brown. This was good from the perspective of using everything up, but not so good for my poor risk-averse nerves. If I had come up short, I would have been trying to find the same dye lot. Given that the kit came from the UK and I’m in Australia, I suspect I would have been out of luck. It’s entirely possible that I lost some floss along the way, but it did cause me some slight heartburn as I neared the end of the floss.

Now that it’s finished, I’m a little sad I won’t be working on it again. Hence, the consideration of the rebound project. If you’re in the market for an easy but slightly hypnotic embroidery project, this one is definitely worth considering.

Scrap bag

An unavoidable by-product of knitting and sewing is all the little scraps of yarn and fabric that are just too short or small to be useful. There’s always a twinge of sadness when I collect all the scraps up and put them in the bin. It’s almost a sense of mourning, like they could be used for something else. Turns out that ‘something else’ is a draught stopper.

The draught avenger.jpg

We live in a fairly draughty house, but our ability to do anything about the gaps under the doors is limited because we’re renting (if we owned this house, that carpet would be a distant memory). Draught stoppers can be purchased fairly cheaply at the supermarket, but at least this way I can pick the fabric, customise the height and length and feel satisfied that those little scraps are no longer wasted.

Even though it’s a ridiculously simple project (it’s just a stuffed tube of fabric, after all), I’ve found that I can use it as a pseudo-rubbish bin, slowly filling it with scraps until it’s at the right length. It does mean that it can end up being a bit lumpy as some scraps pack in a bit tighter than others, but if it’s just sitting on the floor stopping the cold wind from entering the house, I don’t think that matters too much.

For a mildly harebrained idea, it’s worked well so far. It’s only yielded one draught stopper, but even just that one is making the house less breezy, and I feel less guilty about the amount of fabric and yarn scraps I produce.

Marin

On occasion, I come across a knitting pattern that looks like a lot of fun, but isn’t the sort of thing I would wear or use. In these situations, I’ve found that the best solution is make it and then foist the finished object onto an unsuspecting friend or family member. To make myself feel better about the this, I like to call the finished object a ‘present’.

Marin.jpg

Marin by Ysolda Teague
Just shy of 100g Madeline Tosh Tosh Merino Light, Denim
3.25mm needles
Started: July 2012
Finished: August 2012
Ravelryed: here

As soon as Marin began to appear in my friend activity feed on Ravelry, I wanted to make it. Unfortunately, it’s one of those patterns where it looks pretty, but I could never see myself wearing it. Luckily, I discovered the pattern shortly before a dear friend’s birthday, so I was able to foist this version upon her. Even luckier, it was just the sort of scarf/shawl I could see her wearing.

scallops and reversible cables.jpg

This pattern is a lot of fun to knit, with its ribbed scallops and reversible cables. However, it required a lot of concentration. There are several parts to the pattern, and I had to flick back and forth between the parts until at least one part was memorised. I tried to work on it while standing in queues during Melbourne Open House, but that ended with mild frustration and regret that I hadn’t chosen a simple sock as my knitting project for that day.

The only part of the pattern I struggled with was the increases at the start. Even after reading the pattern several times, it wasn’t immediately apparent (to me) how many times I needed to increase the garter stitch section at the start. The problem was solved after reading this very helpful thread on Ravelry about this pattern.

The yarn I used, a 4 ply, was a slightly lighter weight than the 5 ply called for in the pattern. Instead of using 3.75mm needles, I used 3.25mm, as the gauge swatch in stockinette looked much nicer in 3.25mm than 3.75mm. This was a mistake, particularly as the pattern doesn’t contain any stockinette stitch. So while I think my version of Marin looks lovely, it’s probably a little small even with aggressive blocking regime I put it though. There are quite a few people who have knit this pattern using Tosh Merino light, and they all seem to have used 3.75mm needles with good results. I don’t think I’ve ever said this before or will do so again — don’t trust the swatch in this instance.

Marin point.jpg

As I was knitting away at this, I grew to like it more and more, and my initial steadfast ‘I’d never wear this’ reaction started to crumble. Contributing to this wavering is the fact I’ve got some lovely MadTosh sock in Graphite in my stash without a project… Perhaps I could make it work for me after all.

Emergency Beanie

plain ol' beanie.jpg

Long Beanie by Woolly Wormhead
75g Jo Sharp DK, navy
4.00mm needles
Started: July 2012
Finished: July 2012
Modifications: Used lighter-weight yarn, cast on more stitches, knit the ‘body’ longer
Ravelryed: here

It was recently suggested that my Poppa might want a handknit beanie to tame his unruly hair. My first thought, which may result in me being disowned by the knitting community, was that a beanie might exacerbate the unruly hair situation by giving him hat hair. Very shortly after thinking that, I started looking for a basic beanie pattern.

There’s not too much to say about this beanie as it’s simply 1×1 rib paired with plain ol’ stockinette. However, I did like the alternate cable cast on used in the pattern. The first cast on I learnt was the cable cast on, and as versatile as it is, it does end up being a bit tight at times. The alternate cable cast on is much stretchier and I think I’ll be using it in the future for other beanies and top down socks.

the ol' spiral.jpg

The modifications I made to the beanie were fairly minor; I cast on more stitches because I used an 8ply yarn rather than the suggested 12 ply. I also knitted an extra 1 or 2cm before beginning the crown decreases. I wasn’t sure how long Poppa likes his hats to be, but in this instance I thought it better for the beanie to be too long than too short. A long beanie can be remedied by rolling the cuff up higher, a too-short beanie generally means cold ears and annoyance.

The Jo Sharp 8ply has been lurking in my stash for longer than I can remember. I don’t really remember when I bought it, besides it being during my university years, but I do remember the act of buying it. There was an op shop that I used to often visit after classes, and I always sought out the craft section first. Usually the yarn selection was abysmal, but on this day there was a grab bag of yarn which included four balls of Jo Sharp DK. The grab bag cost less than the retail price of one ball of Jo Sharp DK at the time. I remember trying very hard to not show any outward sign of the adrenaline rush that I get (then and now) when I’ve found something in an op shop that I’ve wanted for a long time. At the time, Jo Sharp was one of those desirable yarn brands (Rowan was another) that I really wanted to try but could never justify the expense. It was a real find. It’s funny thinking back on that now, because as it sat in my stash for years, it went from being ‘that great yarn that I bought really cheaply at an op shop’ to ‘another 200 grams of navy 8ply I need to find a use for’.

As far as navy 8ply yarn that I needed to find a use for goes, I think it worked well as a beanie. The fabric had a slightly rough hand before blocking, and it softened slightly after giving it a soak in wool wash. I think it’s also going to be quite hard wearing and I’m hopeful that it has good hair taming attributes. Initial reports suggest that it fits well, the colour is aesthetically pleasing, and that it covers Poppa’s unruly mane well. Who needs Brylcreem when you’ve got a hand knit beanie?

Baby boots

I seem to be at a point in my life where more and more of my blog posts are starting with “a friend/colleague/neighbour/stranger I saw down the street recently had a baby”. This may be a reflection on the frequency of my blog posts rather than the birth rate amongst my friends and acquaintances. Whatever the reason, I’m making more and more baby things and enjoying how my crafty output is changing.

The most recent gift for a baby was a departure from my craft of choice. My friend was having her baby in North Queensland, so I was a bit hesitant to make the baby something that would be too warm. Instead, I sewed some wee booties from some fairly thin wool felt. This decision doesn’t seem nearly as logical when written down; it made complete sense when thinking about a suitable gift a couple of months ago.

baby boots

Felt Baby Shoes from The Purl Bee
Grey wool felt, red embroidery thread
Started: May 2012
Finished: May 2012

They were quite fun to make, and certainly came together faster than a knitted equivalent. I do, however, need to work on my blanket stitch skills because things got a bit wonky where the top of the boots overlapped.

The felt I used was from a jumper Matt wore many years ago. When fulled, it made a soft, thin and slightly fluffy felt that I think worked ok for baby bootees. My favourite part of the boots are the soles, which were from the fulled cuffs of Matt’s jumper. Hopefully it looks like faux-tread, because that’s the effect I was aiming for!

treadly

For me, the most difficult part of the project was sewing elastic in the top of the boot. I kept agonising over the placement of the elastic (and in turn, the little red crosses), but after a bit of trial and error, I think they look pretty even.

Since making these, I’ve made another pair from some Winterwool felt. Rhey look just as good in a more rigid felt, if not better. Conveniently, one of their 20cm by 23cm squares was just enough for one pair of boots. They don’t have the charm (if you can call it that) of the faux-tread, but having a simple ‘1 square of felt:1 pair of boots’ ratio is quite appealing to me.

If you’re looking to make a pair of baby bootees, this pattern is well worth considering. They’re cute, quick, and quite fun.

Bendigo bonnet

Thank you everyone for your thoughts on how to deal with The Pickadilly Situation. You (and Matt) were all right of course. It would be kind of silly to abandon a project when it’s pretty much done. So while I will sew on some buttons and call it done, I probably won’t do that for a little while. I just need to not think about Pickadilly for a bit, and putting it aside is the easiest way for me to do that.

While contemplating Pickadilly’s future, I started and finished a project to wear to the Bendigo Sheep and Wool Show last weekend.

Giant pompom.JPG

Neon Ski Bonnet by Lacey Volk
200g Ms Gusset Ton of Wool Ten, Undyed
4.50mm needles
Started: July 2012
Finished: July 2012
Ravelryed: here

Since it first popped up in my friend activity on Ravelry, I’ve not been able to stop thinking about it. The cables! The twisted ties! The pompom! It didn’t take long to knit, but it would have been quicker had I not embarked on a trial-and-error odyssey. If you wish to make this bonnet without the odyssey, these are the things I found out that might be helpful to others:

  • It’s not absolutely necessary to use magic loop to make the cabled band. If you’re more comfortable with double pointed needles, use those.
  • When finished, the cabled band needs to be long enough to sit between your ear and chin. I had some trouble working this out from the photos in the pattern.
  • Don’t be concerned if one edge column of stocking stitch on the cabled band is uneven. If you pick up stitches for the smocked stitch on that side, it will become more even.
  • The wraps on my wrapped stitches became tighter when working in the round. Altough this is more an issue with my knitting technique, keep an eye on it because tinking wrapped stitches is unfun.
  • In contrast to tinking wrapped stitches, making twists was quite a lot of fun.
  • The pattern describes the pompom as ‘giant’, which wasn’t specific enough for me. My version of ‘giant’ was to use an 85mm Clover pompom maker. Incidentally, if you want your pompom to look poodle-like, like mine, used frogged yarn. I didn’t necessarily intend to have a poodle-like pompom, but I didn’t want to start a new skein of yarn to have a non-poodle pompom.

Ignoring most of those dot points, it was quite a fun knit, and just the antidote I needed for the frustration felt towards Pickadilly.

from the top.jpg

This was my first experience working with Cormo, and I have mixed feelings about it. It stood up well to being frogged multiple times, and the stitch definition was very good for the most part. Stockinette and cables look really good in it, but I wasn’t impressed with how the twisted stitches came out. That said, there may be some issues with my technique which contributed to their lack of definition.

The biggest concern I have about Cormo is its durability. Before using it, I was aware that it had a tendency to felt and had been treating it with more care than normal. However, after the cabled band was wet blocked, it tried its very hardest to pill, making it look untidy before I wore it once. This is it before depilling:

fluffy.jpg

And after:

Less fluffy.jpg

The depiller cleaned it up pretty well, but I can’t help but feel that it’s going to be an ongoing battle. I will see how the fabric goes after I start wearing it a bit more regularly. It does make me wonder what I should do with my remaining Cormo.

As for the show itself, it was a glorious winter morning and a bit too warm for a thick cabled bonnet with a preposterously large pompom. The show seemed quieter this year, with more ‘as seen on TV’-style products. My purchases, as always, were fairly modest. There’s only one purchase I can mention at the moment, and that’s the darning mushroom I forgot to buy last year.

super mushroom.jpg

It’s a simple thing, but I can’t stop marvelling at it. It sits just nicely in my hand, and I really like the colour of the wood used for ‘cap’ of the mushroom. Luckily I’ve not got a use for it yet, but I’m sure that time will come sooner rather than later.

Rollin’

Not long after finishing the tote, I started working on another project from the sewing course I started earlier this year. It was a supplies roll up, something I really needed for my double-pointed needles. Up to this point, my collection had languished in a draw and locating a matching set usually required spending some quality time with a needle sizer.

The project was going swimmingly until the thin cotton lining had to be attached to the canvas outer. The instructions required attaching the pieces with wrong sides together, and I had no end of trouble getting the two pieces to sit together nicely. They were the right size given the measurements in the pattern, but no matter what I did, the two pieces wouldn’t stay just so and they ended up looking messy. After four or five attempts to get it to work (sadly this is no exaggeration), it got put aside until such time as I felt I could revisit it.

Yesterday I got the pieces back out again and tried a different approach. Instead of sewing the pieces together wrong sides facing, I sewed them together right sides facing, turned the piece right side out and top stitched around the edge to secure the pieces together. It worked much, much better for me and before I knew it, the roll was finished.

roll goes up

It’s by no means perfect. There are a number of things that are wonky, but mostly it looks pretty good and I’m pleased enough with it that it’s already in use. The lining is already a bit wrinkled, because I’ve been rolling and unrolling it in a manner not unlike Homer Simpson.

roll goes down

It’s the win that I really needed. I’ve been feeling quite unenthused about my knitting and sewing of late, mostly due to things going wrong (due to mistakes on my behalf and not on my behalf). Now that I’ve finally finished something and feel pleased with how it turned out, I feel like I’m getting back on track. Fingers crossed for smoother crafting seas ahead.

The kindness of strangers, part three

The last of 2011’s yarn miscalculations was rectified early last month when I completed my woodland capelet. Unlike Matt’s scarf, I only slightly miscalculated how much yarn was needed for this project and like Matt’s scarf, it was a fellow knitter on Ravelry who helped me out.

Woodland Capelet, front

Woodland Capelet by Susan Mills
200g(ish) Bendigo Woollen Mills Allegro, Scarlet
5.00mm needles
Started: September 2011
Finished: May 2012
Ravelryed: here

It wasn’t finished in time for Capril nor the last of the warm weather, but I’m glad it’s finished all the same. It’s an easy pattern, but constant increasing and decreasing meant that I had to be paying at least a little bit of attention while knitting it. I think the scalloped edge turned out really well and the ties look quite good in garter stitch. The only reservation I have with the pattern is the shaping around the shoulders. The method used to create the darts was a bit fiddly, and resulted in it looking a bit lumpy at the top of the capelet. It is still an entirely wearable garment, but I can’t help but think there must be a better way to incorporate shaping into an item knit from side to side. I doubt that short rows would really work in this instance, so what that better way is, I don’t know.

Woodland Capelet, back

This yarn was a problem child in my stash. It was an undersized ball of yarn purchased from the Bendigo Woollen Mills, and was going to be used for contrast heels and toes. Then it was going to be a pair of knee high Kalajokis. Finally, it ended up as this capelet. Even though it had a tendency to split from the get go, it held up remarkably well to being frogged and reknit many times.

The colourway I used, Scarlet, had a few strands of red-orange mixed in with the red. When it was knit up, the contrasting orange meant the fabric had very subtle variations in colour which I think worked well. If memory serves me right, all the colourways in the second edition of Allegro had darker contrast colours, which wasn’t as subtle and a little less to my liking. All of this is more or less useless trivia, as Allegro was one of Bendigo Woollen Mills’ limited edition yarns and it appears to be sold out.

With the exception of Pickadilly, which is coming along quite well, my backlog of 2011 WIPs has now been cleared. This means I need to start thinking about an appropriate celebration when the backlog has been properly cleared. At the moment, I think a tickertape parade through the middle of Melbourne would suffice…

The next frontier

I’ve gone off my knitting at the moment. While I wait for the joy of knitting to return, I’ve been doing some sewing.

My relationship with sewing is a slightly strange one; I really like the idea of making my own clothes, quilts, bags etc. but making the leap from thinking it’s a good idea to actually sitting at a sewing machine has always been a challenge. I’ve made a couple of garments in the past which turned out OK, but have never felt particularly comfortable or confident when using my machine. It’s a skill that hasn’t yet clicked for me like knitting did, which has meant that every little hiccup along the way has been met with frustration rather than an acceptance of it as part of the learning process. Really, why can’t it just work?

After finding a great little metal body Bernina at an op shop late last year (I’ll save that tale for another post), I began to get frustrated at the fact I kept getting frustrated with sewing. Like a dog chasing its tail, my frustration went around and around, faster and faster until I stopped and found a sewing e-course that looked interesting. It started at a point below my current level of sewing knowledge, but to my mind that was a good thing; it would help to reinforce the fundamentals I learnt in Year 7 textiles.

tote

The most recent project I made from this course was this tote. It’s quite a simple project, but I’m really happy with how it turned out. I deviated from the pattern a little bit by shortening the side panels and adding a contrast panel down the bottom and it worked out just fine. The contrast panel is some upholstery weight fabric I found in an op shop years ago. It was found on a rainy day, a couple of hours before my shift started at work. I distinctly remember holding onto this small bolt of fabric (the cardboard tube had broken so it was flopping around all over the place), trying not to let it get too wet or hit fellow commuters while taking multiple forms of public transport to work. It was one of my more awkward commutes and it must have been at least a little bit embarrassing for my poor friend (and workmate) who was shopping and then commuting with me.

Yes, anyway, this tote. I’m still a long way from being able to make my own clothes, but this project feels like a turning point. There were a couple of times where things didn’t go quite to plan, but it didn’t elicit the usual response of frustration. I just stopped what I was doing, got my seam ripper out and started again.

As for the course, I have mixed feelings about it. There are a couple of little things that I’m concerned about, but I’ll wait until I’ve completed more of the course before posting my thoughts. In the meantime, the course has meant that I’ve been sewing and I want to keep sewing. The sewing outlook is positive so far, and that’s the most important thing.

The kindness of strangers, part two

From a knitting perspective, last year was quite frustrating. On more that one occasion, I managed to run out of yarn before finishing a project. Some times it was by a just a small amount, other times I was completely off the mark. Running out of yarn is not something that I’m used to; in fact, I tend to buy way too much yarn. The cardigan that was in the last blog post? It’s being knit from yarn left over from Matt’s Henry scarf.

The Man Scarf was one project from last year that was a victim of my dufferism. I used the Ixchel Bison + Bamboo I won (and subsequently bought more of) at the Bendigo Sheep and Wool Show last year. This yarn has terrific yardage for an 8ply so at the time I thought I could get a Matt-sized scarf out of two skeins. I’m not a natural-born optimist so cannot imagine why I felt so confident about getting a long scarf out of 100g/320m. In any case, I was really wrong.

As the second skein ran out, the scarf looked short but I thought it might be ok if Matt wore it under jackets. When Matt tried it on, he looked like Laurel wearing one of Hardy’s short ties. It really wasn’t wearable as a two-skein scarf. Then I found out Charly from Ixchel fibres had sold out of the yarn. I wasn’t mentally prepared for the yarn to be anything but a Man Scarf, so I asked for another skein on Ravelry. As it was not a widely sold, easily accessible yarn, I didn’t hold much hope of finding another skein. Again, I was wrong.

Within an hour I had an offer of a skein. Within a couple of days the yarn was in my possession and I could finish Matt’s scarf. Saved from knitting peril, not for last time, by the kindness of strangers.

matt's scarf

Man by ankestrick/fallmasche
Just shy of three skeins of Bison + Bamboo by Ixchel Fibres
4.00mm needles
Started: Septemberish 2011
Finished: April 2012
Modifications: knit 23 rows between sets of pleats rather than 24
Ravelryed: here

This scarf is essentially stocking stitch with some horizontal pleats. It doesn’t seem that exciting, but the the horizontal pleats are fun to knit and they add a nice bit of texture to the smooth stocking stitch fabric. Because it is stocking stitch, the scarf has a lifelong ambition to curl. This isn’t a big issue for Matt as he tends to wear his scarves in a way that is conducive to curling anyway.

The modification to knit one less row in between sets of pleats was to account for either an error in the pattern or an error in my interpretation of the pattern. The pleats are always worked on the wrong side of the fabric, so in my mind I needed to work an odd number of stocking stitch rows in between sets of pleats. Besides that possible error, the pattern was pretty easy to follow.

drapey

The yarn was really lovely to work with. The softness in the skein translates into soft, smooth fabric, and the bamboo content gives the yarn a lovely sheen. If I could buy more I would, but would probably stick to making smaller accessories with it. With all that bamboo, I’d be worried that a larger, heavier garment made from this yarn would lose its shape.

While this was a slightly suspenseful knit, the little bit of running around to find enough yarn to finish it was worth it. Before casting on, I had some doubts about whether it was the right yarn for the pattern, and vice versa. Soon after casting on, my doubts disappeared. The colour and texture of the yarn was just right for the scarf. I can’t imagine making it in any other yarn.