Archive for December 2010

Round up 2010

In thinking about this post, I was chiding myself about my lack of productivity. Only fourteen finished objects, for shame! Then I thought about it a bit — this year I went overseas, provided Matt with the tiniest little bit of help in releasing his first Mac app, restored some outdoor furniture, completed a graphic design short course (which included doing some cross stitch for the first time in a long long time) *and* finished fourteen knitting projects. So now I understand why, in the twilight of 2010, I’m feeling quite tired.

mosaic 2010

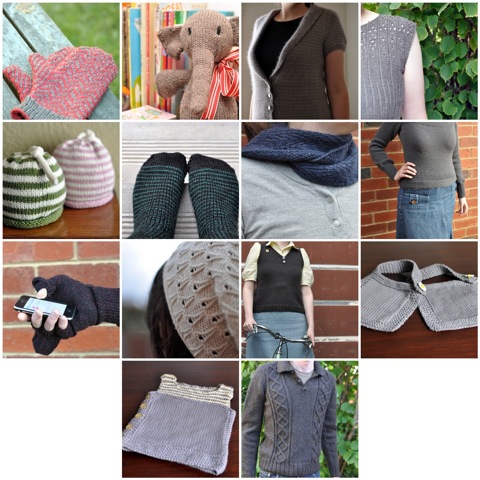
It seems the knitting theme for this year was dark and grey. For many years I was very much a brown and green lass, but these days it’s all about the grey. Looking at my Ravelry queue, next year may be fairly grey too. Just for variety’s sake, I’ll try to provide the odd flash of colour where I can.

A lot of these knits have been used or worn a lot. Matt’s gloves, my herringbone mitts and Still got a good work out during the depths of winter. My grandfatherly vest has been fantastic in this indecisive weather, and Bottom’s Up, despite my concerns about it being too short, is starting to get quite a good run. This encapsulates knitting as a hobby for me; as enjoyable as I find creating objects using sticks and string, it’s knowing that my projects will be used and loved that provides the greatest satisfaction.

It probably a bit funny to follow that profound statement with the declaration of my favourite project of the year, particularly because it’s as-yet unworn and unblogged. Without stealing too much material for my next blog post, I’m thrilled to bits with how Matt’s dashing jumper turned out.

Fare thee well 2010. Let’s hope 2011 will be just as productive, and a little less tiring. Thank you everyone for your comments, emails and readership, I really appreciate the time everyone takes to read my funny little blog.

Little paper stockings

For a good part of yesterday afternoon, Matt and I worked on putting these little beauties together. As many of my non-knitting projects do, this started off as a childhood memory. When I was younger, I really liked receiving those clear plastic stockings filled with popular chocolate bars for Christmas. They’re admittedly cheap, overpriced tat, but there’s no accounting for taste when you’re younger (my love of New Kids on the Block is another example of my dubious taste as a child). From that little seed of a memory, I made my own version of them.

paper stockings

Because they’re pretty quick to put together, and thus could work as a last minute gift, I thought I’d note down how we went about making them.

Ingredients:
Stocking template
Paper
Pencil
Eraser
Sewing thread
Scissors

Wrapped sweets

Method:

I’m not good at drawing, so I found a stocking template on Google Images to trace around. My stockings ended up being around 18cm long, 8.5cm wide at the top and the foot 12.5cm long. However, rather than be prescriptive about it all, I recommend finding a template that appeals and go with that. Or, if you are that way inclined, draw a stocking shape freehand.

traced out stockings

We then traced the stocking shape onto a double layer of paper. We used brown paper from a large stationery chain store and could fit three stockings across the width of the paper. The most important thing about selecting paper to use in this project is to choose something that is strong enough to hold the weight of the sweets and treats you wish to put in them, but not so stiff that it can’t be closed up at the top.

At this point it’s probably best to cut around the stockings, leaving a 0.5-1cm seam allowance, but as my sewing skills are about as good as my drawing skills, I sewed around the stockings first using my sewing machine then cut them out. In some ways this was a good exercise in sewing machine control for me… in fact, it’s possibly something I should have done before launching into sewing garments. Oh well, you live, you learn.

sewn stockings

Then we erased any visible pencil marks, and filled with a delightful assortment of wrapped lollies. I found it a bit difficult to get lollies into the toe of the stocking. This slight issue could easily be alleviated by making a bigger stocking, or using a template where the foot is not at a right angle to the leg.

stocking with lollies

Once the stocking is filled with treats, sew up the top, trim any excess thread and any excess paper at the top, and you’re done!

‘Tis a really simple project; in fact, I’m wondering whether I really needed to write out directions. Unnecessary though they may be, they do provide a good segue way into wishing you all a very relaxing and enjoyable holiday period. Stay safe if you’re driving anywhere, and beware of snow drifts (this goes for people in the northern or southern hemisphere!).

Little details

It’s astounding how seemingly quick projects can be held up by little, but important, details. A fine example of this is a couple of small baby items I started nearly two months ago. The knitting portion of the projects was completed very quickly, but finding the right buttons was really difficult. I visited all my usual haunts (and lamented the shrinking collection of buttons at the Elizabeth Street Clegs), but couldn’t find anything suitable. Finally the right buttons were found and the projects finished.

Pebble

Pebble by Nikol Lohr
1 ball Freedom Sincere DK, grey; a skerrick of Freedom Sincere DK, yellow
4mm needles
Start: November 2010
Finish: December 2010
Modifications: slightly larger needle, small row- and stitch-count changes accounting for gauge, striped garter stitch section
Ravelryed: here

Now that it’s all done and photographed, I’m a little disappointed with how this version of Pebble turned out. Pretty much all of this is down to two decisions I made when first starting Pebble.

The first problem is the yarn choice. As my friend’s baby was due in November, I thought using a cotton yarn would be more practical as we’d ordinarily be heading into warmer weather. So far, this summer can only be described as tepid, so a wool-based yarn might have been ok. It’s been quite some time since I’ve worked with cotton, and had forgotten how unforgiving it is relative to wool. So, the fabric’s probably a bit more uneven than I’d like, and some of the weaving in of ends shows through a little bit on the front.

The second problem is my dogged insistence to have a striped yoke (if it indeed can be called a yoke). Initially I wanted to make the garter stitch section blue, yellow and grey. As it wasn’t possible to hide the edge where I carried the yarns, it looked really messy and was quite bulky. By this stage my friend’s little girl was born so the blue was ditched and the garter stitch section consisted of grey and yellow stripes. Even with one less colour and strand of yarn it still looks a bit messy and bulky.

Despite my mild disappointment with the end result, I think, and hope, it’s still wearable.

ends

One thing I should mention about the pattern is the number of ends it produces. This wasn’t helped by using two colours in the top section, but it still seemed like quite a large number for such a small garment. The photo above shows how many ends were woven in… So don’t be fooled by the fact it requires no seaming. You will be paying for that privilege in the form of weaving in ends.

Happily, the other quick project for my friend’s baby girl turned out quite well. As it happens, there’s a free bib pattern out that roughly matches the pebble vest.

Bibs

Easy Peasy Baby Bib by Michelle Acuavera
Scraps Freedom Sincere DK, grey
4mm needles
Start: November 2010
Finish: December 2010
Modifications: smaller needle, small row- and stitch-count changes accounting for gauge, striped garter stitch section, press stud closure
Ravelryed: here

press stud

These were very quick to make and a good use of leftover grey yarn. Small modifications were made to the number of stitches cast on and rows worked because I used 8ply instead of the recommended worsted weight. After a small amount of market research, I opted to use a press stud as the closure rather than a button hole. According to a friend with an almost 2 year old, a buttonhole closure might prove a bit fiddly. It looked a bit plain with the hidden press stud, so a button was added for purely decorative purposes. I did toy with making some bibs using the yellow cotton, but decided pretty quickly that it wasn’t nearly as practical a colour as the grey.

It was quite a relief to get something, no matter how small, finished. It felt like quite a while since I’d triumphantly snipped off the last woven in end of a project!

The stripes have it

vest plus stripes

Thanks everyone for your opinions on how to proceed with the vest. As you can see, the stripes won.

Despite my rash claims that there was nowhere near enough yarn, there may have been *just* enough to make the vest in one colour. However, I’m not much of a risk taker and having non-matching sections from different dyelots simply wouldn’t do. The gentle prodding in the comments and the fact the two greys look good together may have also played a part in the final decision…

Initially I was a little concerned that the two-row stripes were a bit wide, particularly because I envisioned stripes a la Treeline Cardigan. As I’ve knit more and more, the stripes seem fine as they are. Who knows, with my current enthusiasm, this may end up being my last finished object for the year!