Archive for the ‘Recipe’ Category

Smokey baked beans

baked beans

There’s a cafe not too far away from my house called Little Deer Tracks. Among other things, they make very good baked beans. As much as I’d like to be eat breakfast there every day, it’s not really possible or financially sensible. The only solution to this is to make my own baked beans for those times I can’t enjoy Little Deer Tracks’ baked beans.

The recipe is adapted from the DIY Baked Beans recipe on Taste.com.au. It’s a little different to the beans I’ve had at Little Deer Tracks, but they’re still good in their own way. This amount should easily feed two to three people if the beans are the main part of the meal, and four or more if it’s a side dish.
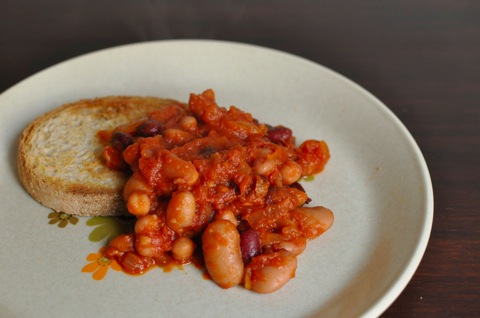
Smokey Baked Beans

Ingredients:
2 teaspoons olive oil
1 small brown onion, diced finely
1 teaspoon smoked paprika (see notes)
1 tablespoon golden syrup
400 gram can of crushed tomatoes (see notes)
2 400 gram cans of 4 bean mix, drained and rinsed
salt to taste

Method:

  • Heat the oil in a medium saucepan over medium heat. Add onion and cook until it is soft, and golden brown in colour. This took around 5-8 minutes for me.
  • Add the smoked paprika to the onions and stir to coat the onions. Cook for about 30 seconds until the smoked paprika becomes really fragrant.
  • Add the golden syrup and stir to coat the onion/paprika mix. Let it cook for 30 seconds to a minute so the onion begins to caramelise slightly.
  • Stir in the can of tomatoes and bring to the boil. Once boiling, turn the heat down to a simmer. Allow the mixture to simmer until it starts to thicken up nicely. This took around 8 minutes for me. At this point you want the mixture to be thick enough to hold the beans, but not so thick that it becomes a paste.
  • Add the beans and stir through the tomato sauce. Cook, stirring often, for 2-3 minutes to allow the beans to heat through.
  • Add salt to taste.

Notes:

  • The smoked paprika adds a nice amount of smokey flavour and spicy warmth. For the smokiness without the spice, liquid smoke can be purchased online (we bought some from here) or at specialty grocers. I’ve not seen it for sale at either of the two large supermarket chains (but am happy to be corrected).
  • I used crushed, rather than diced, tomatoes in this recipe as I wanted a smoother tomato sauce. A sauce using diced tomatoes would be chunkier, but would probably require more cooking time to thicken.

Skyrockets in flight, Apricot Delight

This year’s desiccated coconut stashdown ended with a whimper recently when I realised I had exhausted my stockpile and needed to dash to the supermarket to replenish stocks. However, my pursuit for recipes that use desiccated coconut is unrelenting. A bit like a cop, gone off the rails, who pursues justice at any cost. I’ll be making a pitch for a new TV show, The Desiccated Coconut Avenger, to TV execs in the near future.

This is the latest recipe involving desiccated coconut that I’ve been using. It’s from Green Gourmet Giraffe, a vegetarian cooking blog I’ve only just discovered. Sometimes I can be a bit slow on the blog uptake.

apricot delight

Apricot Delight (recipe adapted from here)

125g whole dried apricots, roughly chopped (see note)
125g dried apricot halves, finely chopped (see note)
0.75 cup boiling water
2 tablespoons of honey
1.5 cups desiccated coconut
extra coconut for coating (optional)

Place the chopped whole dried apricots, boiling water and honey in a small saucepan. Let the apricots soak for around an hour. Bring the mixture to the boil and gently simmer, uncovered, for around 10 minutes, or until the apricots have a jam-like consistency.

Blend the mixture up into a thick paste. It was too thick for my poor old blender to handle when I first made it, so I used a stick mixer the second time round. It worked like a charm. Add the desiccated coconut and the chopped apricot halves to the paste and mix well.

Press the mixture into lined small cake tin. The original recipe calls for a 15cm x 15cm cake tin, which I didn’t have. I used a small loaf tin and it worked out fine. Refrigerate overnight.

If the mixture makes it through the night, cut it up into squares or bars. Toss in extra coconut if you so desire, but I found it was fine without the extra coconut.

Note: It’s not necessary to use two different types of apricots. However, the first time I made this recipe I used dried apricot halves and found it pretty tart. Using the milder-flavoured whole dried apricots as the base nicely complements the pieces of the ‘tarter’ dried apricot halves throughout the mixture.

The two times I’ve made this recipe, it’s barely made it through the overnight refrigeration (i.e. it’s delicious). The very short ingredient list appeals a lot, and it’s really easy to make. It reminds me a lot of Apricot Sun Bars which I used to love when I was little.

Even writing this post makes me want to make a batch. Sadly, these TV pitches won’t write themselves…

Desiccated coconut stashdown 2011

Last week a momentous decision was made — it was time to run down my stash of desiccated coconut. My stash of desiccated coconut was first mentioned over a year ago, and despite my best efforts, it’s probably increased since then. Last week I made Coconut Pullapart Rolls from Not Quite Nigella. They turned out really well, and next time I’ll add some lime zest to the coconut filling.

Today I consulted my Women’s Weekly recipe cards and came up with this delightful cake.

Toasted Coconut Cake

Cake

0.5 cups desiccated coconut
125 grams butter
1 cup of brown sugar, lightly packed
1 tablespoon golden syrup
2 eggs
a pinch of salt
0.5 teaspoon vanilla
1.5 cups self-raising flour, sifted
0.5 cup milk

Icing

1 cup icing sugar
1.5 tablespoons lemon juice
2 tablespoons desiccated coconut, extra

Preheat oven to 180 degrees celsius, and grease and line a 20cm round cake tin

Toast all the coconut in a frypan over low heat, being careful not to burn. Set aside two tablespoons for the icing.
Cream butter and sugar together until light and fluffy. Beat in golden syrup.
Add in eggs one at a time, beating the first in thoroughly before adding the second.
Mix in the coconut, vanilla and salt. Add in the sifted flour gradually, alternating with the milk. Mix well.

Bake for 35-40 minutes. When cool, ice with lemon icing, sprinkling the rest of the toasted coconut on top.

For the icing, simply sift the icing sugar and add the lemon juice. Mix until it’s at a soft spreading consistency.

This cake is fantastic. The toasted coconut reminds me of the marshmallows from Darrel Lea, and the combination of brown sugar and golden syrup gives it a faintly caramel flavour. Although I followed the recipe this time round, it would work just as well (or better) with the fluffy lemon icing used on the ginger cake I made last year. It’s a pretty moist cake which surprised me. I imagined that the crumb would be drier, but the all-knowing toothpick came out clean so it was done based on that test. That said, it wouldn’t have hurt to bake it a little longer.

Now my desiccated coconut stash is much much lower than a fortnight ago, and hopefully I’ll be able to keep it at manageable levels. I really dislike wasting food, and unfortunately it’s really easy to do in my pantry with it’s deep shelves. Previously I have tried to keep track of my pantry contents via a spreadsheet, but there must be a better way. Does anyone have any recommendations for pantry inventory apps for Mac? If not, I may need to have a word with Matt…

Ginger cake

Cakes are the bane of my baking existence. My attempt to make a sponge cake in Year 7 Home Economics resulted in a spongey pancake, despite following the recipe to the letter. And a failed attempt to bake my birthday cake a few years ago ended with a teary phone call to my parents, telling them not to visit (of course they still visited). In the case of the birthday cake I was admittedly also feeling stressed about a looming uni assignment deadline at the time, but it was the cake that pushed me over the edge of sanity and into the embarrassing dramatic display void.

Clearly, I bear the psychological scars of cake failure, so It was with some trepidation that I tried this cake recipe. I (and Matt, for that matter) am glad to report it was a complete success!

ginger cake

Ginger Cake (from Women’s Weekly Recipe Cards, circa 1970’s)

Cake:
185g butter
1 cup treacle
2 cups brown sugar, lightly packed
4 cups plain flour
0.5 teaspoons salt
1 tablespoon baking powder
2.5 tablespoons ground ginger (the recipe calls for 1.5 tablespoons, but I like ginger a lot)
1 teaspoon bicarb soda
1 egg

1.25 cups milk, warmed slightly

Preheat oven to 180C. Grease and line two deep 20cm tins

Place butter, treacle and brown sugar into saucepan, stir over low heat until sugar dissolves and leave to cool.

Sift flour, salt, baking powder, ginger and soda into large bowl, add cooled sugar mixture, lightly beaten egg and warmed milk. Mix well.

Pour mixture into tins, and bake for 55 to 60 mins. Cool slightly before turning out onto cake cooler. Ice when completely cool

Icing:

90g butter
3 cups icing sugar, sifted
2 tablespoons lemon juice (I measured the first tablespoon, then added to taste)

Cream butter until soft, then gradually add icing sugar. Add lemon juice to taste, and until it’s soft and light.

It’s a pretty dense cake, but the light and fluffy icing offsets this well. Most importantly, it’s a delicious cake. The only drawback is that the recipe yields two cakes, and it’s hard to halve the recipe on account of the one egg. I can’t say I’ve conquered my fear of baking cakes, but this recipe has certainly put me on the road to recovery.

Nuts and bolts

Here is the last of the quick family recipes that only get rolled out during Christmas. This one absolutely positively always gets made. Such is its importance, I was making it early on Christmas morning so we wouldn’t miss out on it!

DSC_1426.jpg

I’m not sure how this one will be received because of two things; it contains a slightly strange ingredient and it’s really not a healthy recipe at all. But it all gets eaten so quickly that it can’t be too bad, right?

Nuts and Bolts

300g Nutrigrain
375g packet Salted peanuts (we use unsalted mixed nuts)
1 packet Cream of Chicken soup (we use cream of vegetable)
1 packet French Onion Soup
1 teaspoon curry powder
0.5 teaspoon mustard powder
0.5 cup of oil (usually vegetable oil)

Pour warm oil over dry ingredients, stir until oil is mixed through, store in an air tight container.

The recipe has been slightly vegetarianised (by using cream of vegetable rather than cream of chicken soup powder) for my and Matt’s benefit. It also tastes a lot better the next day as the oil has time to soak into everything.

My Mum also notes to keep the Nuts and Bolts away from my Dad. So if you have made it and my Dad comes round, make sure you hide it. He will eat it all.

I hope everyone had (or is continuing to have) a relaxing Christmas break, and I guarantee the next post will be about knitting.

Chatterbox

Lots of blogable bits and bobs going on, but not enough time to post. It’s a busy time of year I guess.

It was lovely to read about the things people only make around Christmas time. Gingerbread was mentioned a few times which made me wonder why my family doesn’t bake gingerbread biscuits around Christmas time. We all seem to like gingerbread, so maybe it’s a tradition that can be introduced (next year).

Here’s another snacky thing that magically appears in my parents’ fridge around about this time of year, peanut clusters. I feel a bit silly posting a recipe for this, but there’s no harm in putting it up here.

DSC_1334.jpg

Peanut Clusters

375 grams chocolate. White, milk, dark all works well
200 grams unsalted peanuts

Line trays with baking paper.

Melt the chocolate completely. Stir in the peanuts, coating thoroughly.

Place teaspoons of the mixture on the baking paper and leave to set.

The best aspect of this recipe is how flexible it is. If you want the mixture a bit stiffer, add in more nuts or less chocolate, and vice versa for a cluster with a bigger pool of chocolate at the base. Don’t like peanuts? Use another nut. Or dried fruit. White chocolate, pistachios and dried cranberries are a pretty nice combination.

I’d like to post one more Christmas recipe, but it’s likely to be just after Christmas Day. Seems a bit silly, but I don’t think anyone will mind too much!

Coconut Ice

While not a particularly festive person, I think it’s nice to hear about other family’s holiday traditions. Christmases around here are a very quiet affair, just the immediate family and a very low key lunch. However, we do tend to make a lot of snacky things that aren’t made at any other time of the year.

One of those is coconut ice. The smallest hint of it makes me think of Christmas. As mentioned in a previous post, the recipe we use is very simple; just desicated coconut, icing sugar, condensed milk and food colouring. Most years it was traditional white and pink, but sometimes Mum could be convinced to branch out to different colours.

DSC_1351.jpg

Mooncalf commented that the coconut ice recipe in Hope and Greenwood’s book didn’t turn out too well. Even though I’m sure everyone has their own favourite coconut ice recipe, here’s the recipe I use.

Coconut Ice
3 cups desicated coconut
4 cups icing sugar, sifted
1 400g can condensed milk
red (or any other colour of your choice) food dye

Mix icing sugar and coconut together, then stir the condensed milk in thoroughly. Split the mixture in half. Press one half of the mixture into a lined tin (I used a 20cm by 20cm tin) and put in the fridge. Add a few drops of food colouring into the other half of the mixture and knead until the colour is even. Press the coloured mixture over the white mixture. Put in the fridge until set.

How many pieces it yields depends on how you cut it. I prefer smaller bits as it seems to go further and it’s pretty sweet.

In the weeks before Christmas, I might put up a couple more recipes that only get rolled out during the holiday period. Do you have many recipes that only come out round this time of year?

Crisp clutternut biscuits

Every room of the house seems to be filled with clutter. Old documents and bills, knitting paraphernalia, video games, boxes, clothes, you name it, it’s cluttering up my house. It’s also getting quite frustrating – I simply do not know how I managed to let things get this bad (actually I sort of do… my old house had lots more storage than this one). It feels very wasteful. So I’m having a good old fashioned stocktake and purge. Seeing the eBay, op shop and bin piles get bigger and bigger is kind of satisfying, but also makes me realise how little thought I put into some of my purchases.

Clutter has also found its way into the pantry. As a household, we’re really good at buying things we didn’t realise we already had, even when we plan weekly meals. Luckily, this tends to be mostly longlife or non-perishable stuff that I know I’ll use up one day. One of those things is desiccated coconut. Luckily (again) one of the ingredients that is used a lot in my Women’s Weekly Recipe cards is coconut (and ginger too, but that’s a story for another day).

DSC_1080 (1).jpg

Crisp Coconut Biscuits (from Women’s Weekly Recipe Cards, circa 1970’s)

Ingredients:

125 grams butter
1 cup caster sugar
1 egg
2 cups self-raising flour
1 cup desiccated coconut

pinch of salt
1-2 teaspoons of milk
Sugar, for dusting

Preheat oven to 180 degrees celsius.

Cream butter and sugar. Beat in egg. Add in sifted flour, salt and coconut and mix well.

I found the mixture too dry at this point, so added in milk until it was at a consistency where it could be easily moulded into balls but didn’t stick to my hands.

Roll teaspoonfuls into balls and press flat. Dip the top of the dough disc into sugar and place on a greased baking tray. Allow room for spreading.

Bake for 10 to 15 minutes, until lightly golden.

I got around 30 biscuits out of this recipe. If I were to make this again (which is highly likely), I’d use plain ol’ white sugar rather than caster sugar for dusting. While you can see the caster sugar on top of the biscuit, I think the coarser sugar would look better.

The return of the Women’s Weekly Recipe Card Challenge

It’s been far too long since last posting about a recipe made from my box of Women’s Weekly Recipe Cards. This is not to say I haven’t been using these cards; there are some recipes I’ve made many many times. I’ve just not been very good at documenting it.

Today’s offering is Blackberry Swirls. They are like chelsea buns, but with berries. While they call for blackberries, being blackberry scrolls and all, I couldn’t find canned blackberries at my local supermarket. However, they did have cans of mixed berries, which seemed to work well. For a change, I’m going to include the recipe this time.

Blackberry swirls – the mixed berry variation (from Women’s Weekly Recipe Cards, circa 1970’s)

Scrolls Ingredients:

1.5 cups self-raising flour
400g can berries (drain, but retain the syrup)
0.5 cup milk
125 grams butter

Sauce Ingredients:

0.5 cups white sugar
1/3 cups sweet white wine
30 grams butter
0.5 cups berry syrup

Preheat oven to 200 degrees celsius.

Sift flour and rub in butter until the mixture resembles breadcrumbs. Add milk, and mix to a soft dough. If you find the mixture is too wet at this point, add small amounts of flour until it’s at a consistency where it can be rolled out pretty easily.

Place dough on a lightly floured surface, knead gently and roll into a 25cm by 35cm rectangle. Spread berries over dough, leaving a small border around the edges. Roll the dough up lengthways (so the roll is the length of the shorter edge of the rectangle). Make sure the berries are being rolled up in the dough and not pushed along! Cut into 2.5cm slices and place into a greased, ovenproof dish.

Put sauce ingredients into a saucepan. Bring slowly to the boil, stirring constantly until the butter is melted. Boil for 3 minutes. Pour the sauce over the scrolls and bake for 30-35 minutes.

You’ll be excused for feeling sceptical of the recipe as you put the scrolls in the oven, as it sort resembles scroll islands in a berry sea. Well, it did for me anyway.

DSC_0941.jpg

After coming out of the oven, the scrolls looked like this, making me instantly forget my scepticism. The sauce becomes a lovely syrup at the bottom of the scrolls, and gives a nice glaze on top.

DSC_0947.jpg

The original recipe suggests serving it with cream or custard. I had it with a cup of tea and it was just fine!