Archive for the ‘WW recipe card challenge’ Category

Desiccated coconut stashdown 2011

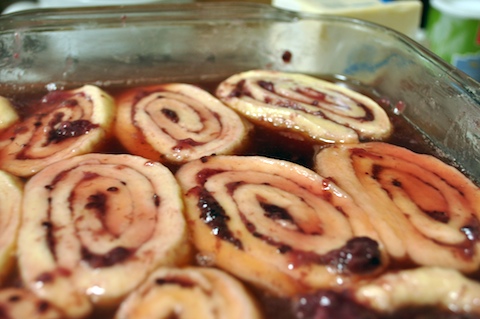
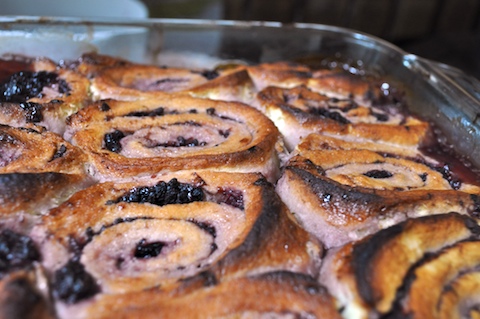
Last week a momentous decision was made — it was time to run down my stash of desiccated coconut. My stash of desiccated coconut was first mentioned over a year ago, and despite my best efforts, it’s probably increased since then. Last week I made Coconut Pullapart Rolls from Not Quite Nigella. They turned out really well, and next time I’ll add some lime zest to the coconut filling.

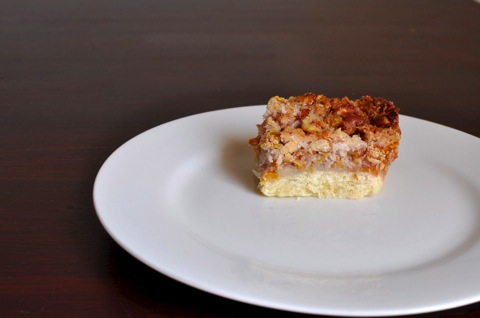
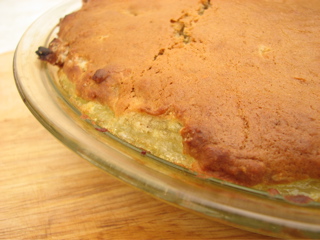
Today I consulted my Women’s Weekly recipe cards and came up with this delightful cake.

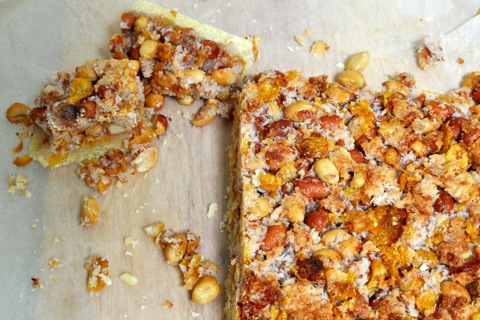
Toasted Coconut Cake

Cake

0.5 cups desiccated coconut
125 grams butter
1 cup of brown sugar, lightly packed
1 tablespoon golden syrup
2 eggs
a pinch of salt
0.5 teaspoon vanilla
1.5 cups self-raising flour, sifted
0.5 cup milk

Icing

1 cup icing sugar
1.5 tablespoons lemon juice
2 tablespoons desiccated coconut, extra

Preheat oven to 180 degrees celsius, and grease and line a 20cm round cake tin

Toast all the coconut in a frypan over low heat, being careful not to burn. Set aside two tablespoons for the icing.
Cream butter and sugar together until light and fluffy. Beat in golden syrup.
Add in eggs one at a time, beating the first in thoroughly before adding the second.
Mix in the coconut, vanilla and salt. Add in the sifted flour gradually, alternating with the milk. Mix well.

Bake for 35-40 minutes. When cool, ice with lemon icing, sprinkling the rest of the toasted coconut on top.

For the icing, simply sift the icing sugar and add the lemon juice. Mix until it’s at a soft spreading consistency.

This cake is fantastic. The toasted coconut reminds me of the marshmallows from Darrel Lea, and the combination of brown sugar and golden syrup gives it a faintly caramel flavour. Although I followed the recipe this time round, it would work just as well (or better) with the fluffy lemon icing used on the ginger cake I made last year. It’s a pretty moist cake which surprised me. I imagined that the crumb would be drier, but the all-knowing toothpick came out clean so it was done based on that test. That said, it wouldn’t have hurt to bake it a little longer.

Now my desiccated coconut stash is much much lower than a fortnight ago, and hopefully I’ll be able to keep it at manageable levels. I really dislike wasting food, and unfortunately it’s really easy to do in my pantry with it’s deep shelves. Previously I have tried to keep track of my pantry contents via a spreadsheet, but there must be a better way. Does anyone have any recommendations for pantry inventory apps for Mac? If not, I may need to have a word with Matt…

Peanut Slice

Every now and again, I receive emails from someone looking for a particular recipe from my set of Women’s Weekly recipe cards. Often they’re looking for recipes that they, or someone in their family, used to make when the cards first came out. While the cards are long gone, I find it interesting that the memory of the recipe, or more, the resulting dish, endures.

Recently, I received an email asking if I had a recipe for peanut slice. It was one of those recipes what wasn’t in the photo of the card — a bonus recipe, as Pip calls it. When I went searching for the recipe, I imagined something chocolatey and biscuity. My perception was completely wrong, as it was a concoction of flavours I’d never imagined before — beer nuts (peanuts with their red skins on), coconut, raspberry jam and cornflakes! I was skeptical, but it had me so intrigued that I had to make it.

Peanut Slice

You know, it wasn’t half bad! It certainly was a strange combination of flavours, but it was certainly quite edible. Unfortunately I don’t think it quite worked out for me, as it was quite crumbly. As the recipe called for whole peanuts, the slice would just fall apart as I tried to cut through the soft topping.

crumbly peanut slice

I’m quite sure this is because of eggs. I don’t use eggs in cooking, and the topping required stiffly beaten egg whites, something I’ve not been able to find a good substitute for. I suspect the egg whites acted like a glue to make the topping firm and easy to cut through. It was a little disappointing that it didn’t work for me and for that reason, I’m hesitant to post the recipe — let me know if you’re interested and I may post it at a later date. Despite the slight disappointment, it was a fun experiment!

Ginger cake

Cakes are the bane of my baking existence. My attempt to make a sponge cake in Year 7 Home Economics resulted in a spongey pancake, despite following the recipe to the letter. And a failed attempt to bake my birthday cake a few years ago ended with a teary phone call to my parents, telling them not to visit (of course they still visited). In the case of the birthday cake I was admittedly also feeling stressed about a looming uni assignment deadline at the time, but it was the cake that pushed me over the edge of sanity and into the embarrassing dramatic display void.

Clearly, I bear the psychological scars of cake failure, so It was with some trepidation that I tried this cake recipe. I (and Matt, for that matter) am glad to report it was a complete success!

ginger cake

Ginger Cake (from Women’s Weekly Recipe Cards, circa 1970’s)

Cake:
185g butter
1 cup treacle
2 cups brown sugar, lightly packed
4 cups plain flour
0.5 teaspoons salt
1 tablespoon baking powder
2.5 tablespoons ground ginger (the recipe calls for 1.5 tablespoons, but I like ginger a lot)
1 teaspoon bicarb soda
1 egg

1.25 cups milk, warmed slightly

Preheat oven to 180C. Grease and line two deep 20cm tins

Place butter, treacle and brown sugar into saucepan, stir over low heat until sugar dissolves and leave to cool.

Sift flour, salt, baking powder, ginger and soda into large bowl, add cooled sugar mixture, lightly beaten egg and warmed milk. Mix well.

Pour mixture into tins, and bake for 55 to 60 mins. Cool slightly before turning out onto cake cooler. Ice when completely cool

Icing:

90g butter
3 cups icing sugar, sifted
2 tablespoons lemon juice (I measured the first tablespoon, then added to taste)

Cream butter until soft, then gradually add icing sugar. Add lemon juice to taste, and until it’s soft and light.

It’s a pretty dense cake, but the light and fluffy icing offsets this well. Most importantly, it’s a delicious cake. The only drawback is that the recipe yields two cakes, and it’s hard to halve the recipe on account of the one egg. I can’t say I’ve conquered my fear of baking cakes, but this recipe has certainly put me on the road to recovery.

Crisp clutternut biscuits

Every room of the house seems to be filled with clutter. Old documents and bills, knitting paraphernalia, video games, boxes, clothes, you name it, it’s cluttering up my house. It’s also getting quite frustrating – I simply do not know how I managed to let things get this bad (actually I sort of do… my old house had lots more storage than this one). It feels very wasteful. So I’m having a good old fashioned stocktake and purge. Seeing the eBay, op shop and bin piles get bigger and bigger is kind of satisfying, but also makes me realise how little thought I put into some of my purchases.

Clutter has also found its way into the pantry. As a household, we’re really good at buying things we didn’t realise we already had, even when we plan weekly meals. Luckily, this tends to be mostly longlife or non-perishable stuff that I know I’ll use up one day. One of those things is desiccated coconut. Luckily (again) one of the ingredients that is used a lot in my Women’s Weekly Recipe cards is coconut (and ginger too, but that’s a story for another day).

DSC_1080 (1).jpg

Crisp Coconut Biscuits (from Women’s Weekly Recipe Cards, circa 1970’s)

Ingredients:

125 grams butter
1 cup caster sugar
1 egg
2 cups self-raising flour
1 cup desiccated coconut

pinch of salt
1-2 teaspoons of milk
Sugar, for dusting

Preheat oven to 180 degrees celsius.

Cream butter and sugar. Beat in egg. Add in sifted flour, salt and coconut and mix well.

I found the mixture too dry at this point, so added in milk until it was at a consistency where it could be easily moulded into balls but didn’t stick to my hands.

Roll teaspoonfuls into balls and press flat. Dip the top of the dough disc into sugar and place on a greased baking tray. Allow room for spreading.

Bake for 10 to 15 minutes, until lightly golden.

I got around 30 biscuits out of this recipe. If I were to make this again (which is highly likely), I’d use plain ol’ white sugar rather than caster sugar for dusting. While you can see the caster sugar on top of the biscuit, I think the coarser sugar would look better.

The return of the Women’s Weekly Recipe Card Challenge

It’s been far too long since last posting about a recipe made from my box of Women’s Weekly Recipe Cards. This is not to say I haven’t been using these cards; there are some recipes I’ve made many many times. I’ve just not been very good at documenting it.

Today’s offering is Blackberry Swirls. They are like chelsea buns, but with berries. While they call for blackberries, being blackberry scrolls and all, I couldn’t find canned blackberries at my local supermarket. However, they did have cans of mixed berries, which seemed to work well. For a change, I’m going to include the recipe this time.

Blackberry swirls – the mixed berry variation (from Women’s Weekly Recipe Cards, circa 1970’s)

Scrolls Ingredients:

1.5 cups self-raising flour
400g can berries (drain, but retain the syrup)
0.5 cup milk
125 grams butter

Sauce Ingredients:

0.5 cups white sugar
1/3 cups sweet white wine
30 grams butter
0.5 cups berry syrup

Preheat oven to 200 degrees celsius.

Sift flour and rub in butter until the mixture resembles breadcrumbs. Add milk, and mix to a soft dough. If you find the mixture is too wet at this point, add small amounts of flour until it’s at a consistency where it can be rolled out pretty easily.

Place dough on a lightly floured surface, knead gently and roll into a 25cm by 35cm rectangle. Spread berries over dough, leaving a small border around the edges. Roll the dough up lengthways (so the roll is the length of the shorter edge of the rectangle). Make sure the berries are being rolled up in the dough and not pushed along! Cut into 2.5cm slices and place into a greased, ovenproof dish.

Put sauce ingredients into a saucepan. Bring slowly to the boil, stirring constantly until the butter is melted. Boil for 3 minutes. Pour the sauce over the scrolls and bake for 30-35 minutes.

You’ll be excused for feeling sceptical of the recipe as you put the scrolls in the oven, as it sort resembles scroll islands in a berry sea. Well, it did for me anyway.

DSC_0941.jpg

After coming out of the oven, the scrolls looked like this, making me instantly forget my scepticism. The sauce becomes a lovely syrup at the bottom of the scrolls, and gives a nice glaze on top.

DSC_0947.jpg

The original recipe suggests serving it with cream or custard. I had it with a cup of tea and it was just fine!

French Cheese Stick

Being vegetarian, a lot of the savoury recipe cards aren’t really suitable, so savoury delights will be few and far between. I suspect that even if I didn’t mind eating meat, not many of the savoury offerings would really do it for me – tripe in parsley sauce anyone? I must get a scanner in the near future, and share some of these culinary delights.

This week’s offering is the french cheese stick. The french reference loses me a bit, as it contain curry and mustard powders, and the cheese is just good ol’ cheddar cheese. Perhaps it’s the mustard that gives its frenchness. As the title indicated that it was a french stick, I assumed it was bread, but it’s more of a scone dough with curry and mustard powders, and chunks of cheese.

IMG_3572.jpg

I had never plaited dough before, so doing that was quite fun, and made the bread look really good. It was also nice to be able to put my many years of training as a professional my little pony tail plaiter to use. I had often wondered if it was time well spent as a kid. Let me assure you, it was.

I’m still in two minds on this one. The curry flavour and turmeric colour of the bread is kind of wrong, but kind of not. The cheese chunks are great, especially when it’s warm, because you get a nice surprise of melted cheese. I think it’s worth another chance, but next time I might ditch the curry powder.

Apple Gingerbread

There’s been a few things I’ve been wanting to blog about, but my blog got chewed up and spat out by my (now ex) hosting company. It seems a little out of date now, but I think I’ll still write about it anyway.

A couple of weekends ago, I was finally well enough to cook something else from the Women’s Weekly recipe cards. I opted for something a little different this time, apple gingerbread. The best way to describe it is a layer of stewed apples with a gingery cakey layer on top. On a slight tangent, I’ve noticed that the 70s (about when the recipe cards were printed) were very good to coconut and ginger, as a lot of the recipes contain at least one of those ingredients. Tis lucky I like both of them!

IMG_3511.jpg

Getting back to the recipe at hand, besides nearly forgetting the brown sugar for the cake layer which no matter how hard I try, cannot really be blamed on the recipe, it was really easy. The hardest thing was peeling and chopping the apples, but if you were feeling really slack, you could use tinned apples.

IMG_3509.jpg

It flew off the pie dish so quickly! I made it in the morning, and it was well gone by the evening, just between the two of us. We are piggies indeed. Next time, I think I might try stewing the apples with a cinnamon stick, to give the apple layer a bit more flavour.

Coconut rough

This is actually from last weekend, but unfortunately life got in the way.

When I was in primary school, we used to be sent home with catalogues of lollies, as a way of doing fundraising for our little school. It may just be residual childhood excitement, but I remember it being so much better than the current form of chocolate fundraising. Anyway, one type of lolly we used to get was coconut roughs. They were in the shape of a barrel, and as we all know, things taste better when they’re an unconventional shape. I was quite excited when I saw the recipe card for them, because I’d completely forgotten about coconut roughs until that point.

I don’t have a barrel chocolate mould, so I knew the taste would suffer somewhat, but I forged ahead with it nonetheless. They were extraordinarily easy to make, as it was a case of melting chocolate and copha together, then mixing the rest of the ingredients in. The results of forming the mounds were a bit mixed, however.

coconut rough 1.jpg coconut rough 2.jpg

The early batches were good, forming little mounds like the one on the left. As the mixture started to set, they didn’t look so good. I don’t want to have to say mouse poo, but I can’t think of any other way to describe the results on the right.

Next time – there will be one, because they were so easy and delish – I’ll probably use a bit more chocolate, so they form a bit of a base for the coconut rough. I might even try to find a barrel chocolate mould, to make it taste better.

No recipe card challenge this weekend though, as I spent the weekend in Sydney, and I’ve come down with a nasty cold – two issues not conducive to cooking at home.

Now with less knitting!

I came across a box of Woman’s Weekly recipe cards while op shopping a couple of weeks ago. I bought it not so much for the savoury recipes – chicken in beer really isn’t my thing – but for the sweets. After going through the cards, and sorting them into recipes to try and recipes to leave be, I decided that I should attempt to try one recipe each weekend. First cab off the rank was peanut and ginger toffee.

IMG_3312.jpg

Donna Hay food styling it ain’t, but it still looked tasty, and pretty simple. Here’s my attempt:

IMG_3311.jpg

Donna Hay food styling it ain’t, but I don’t mind a bit. It’s delicious. The most difficult parts were chopping up the crystallised ginger, as it kept sticking to the knife and being a general nuisance, and getting the temperature right when making the toffee. Once those two things were sorted out, it was very easy.

Even though the crystallised ginger was the only source of ginger in the brittle, and was in little clumps everywhere, the flavour spread through the toffee very nicely. It was most definitely the highlight in a very very dark, dreary day.

I’m trying very hard to ration it out, as even though it’s so easy to make, I really have to push on and make something different this coming weekend. At least I know what I will be up to every weekend til 2012!