The start of sleeves

This week’s goal was to get to the major increases on my dolman sleeve cardigan. The only impediment I had to reaching my goal was the weather. It was absolute stinker of a week in Melbourne, with hot days, hot nights, crowded trains and general (in my mind, justified) moaning about the weather. Knitting in this weather wasn’t fun, and I did question my sanity many times, but I plugged along and juuuuust made it to the major increases yesterday.

The start of sleeves.jpg

The upside to spending a lot of time working on the cardigan is now I really know the pattern. I’d mentioned before that it was a fairly easy pattern to remember, but it turns out I was lying a little bit. I found the basic structure easy to remember, but there are two mirrored twisted stitches close to one another that I had a lot of trouble committing to memory. I’m still occasionally having to rework the twists, but a lot less often than I was earlier in the week.

Now I can start to see the sleeves coming along on the cardigan, I want to keep going. So, next week’s non-binding, no consequences goal is to finish the sleeves. That does mean working on 224 stitch rows, but it’s at least going to be a lot cooler this week. Small mercies and all that.

Under/over achiever

Last year my crafting output could be charitably described as ‘minimal’. This was for various reasons, but one of them was lack of focus. Projects would be picked up and put down after only a couple of rows, and nothing seemed to get finished. This year, I’m trying a different tack by having little crafting goals for each each week. Being a fairly risk averse person prone to chronic bouts of dufferism, each week’s bar is going to be set pretty low. There will be no death-defying crafting stunts going on here.

This week’s goal was to get up to the armhole decreases on the right front piece of the Tri-Cable Cardigan mentioned in my last blog post. I’d been motoring along fairly well on the body, but getting to the armhole decreases always feels like a milestone (and in some cases, a minor victory).

Not only did I achieve my completely non-binding, no consequences goal, but completely overachieved by finishing the whole piece.

DSC 0026

The more I work on this project, the more I’m drawn in by its knitted web of charms. However, its progress is going to slow a lot now I’m on the second front piece, which requires a row counter to keep track of when buttonholes need to go in.

Next week’s goal is slightly more adventurous: getting to the major increases for the sleeves on the dolman sleeve cardigan. There aren’t too many rows to knit to get there, but there is row counting and this weather forecast to contend with:

Is this a joke?.jpg

Let’s just see how many strange looks I can get from fellow commuters while I’m knitting 8ply alpaca on a 41 degree day…

On reflection

Over the last couple of weeks I’ve been debating whether to do a round up of 2013. I like reading round up posts, it’s nice to see how people have felt about their year. Also, there’s something cathartic about summing it all up; it packages everything up to be stowed away for (possible) future reading and remembering.

This time I’ve got a case of the ‘don’t wannas’. My knitting output was minimal, and outside of knitting there’s just some happenings that I’m not ready to think or write about. So instead of an end of year review, I’m going to postpone any reviewing until July(ish), which will mark one year since the start of a year of vintage knitting. It’s quite a convenient way to procrastinate, but I’m using it.

I’ve still got a couple of FOs waiting for their moment in the bloggy sun, but before I get around to that, here are the projects that have followed me into the new year.

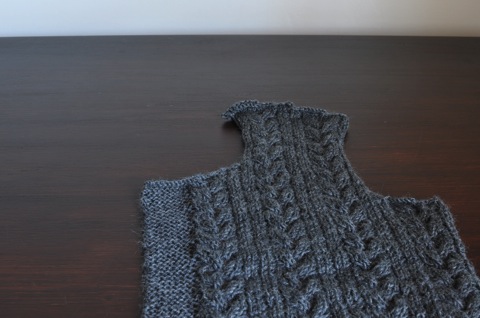
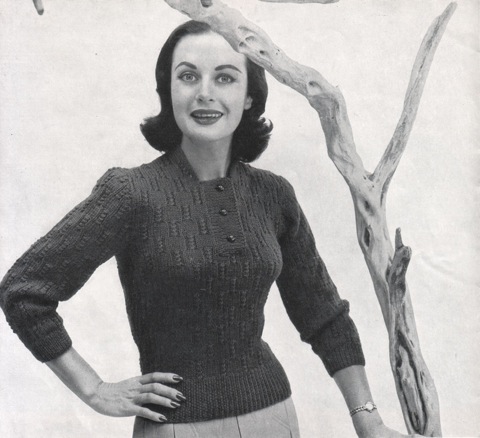
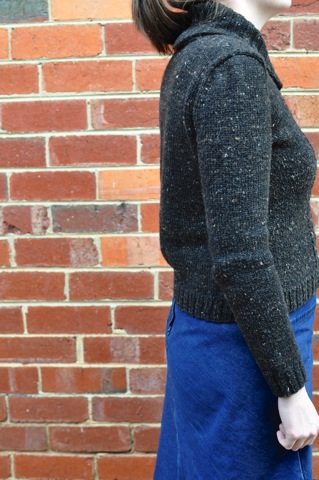
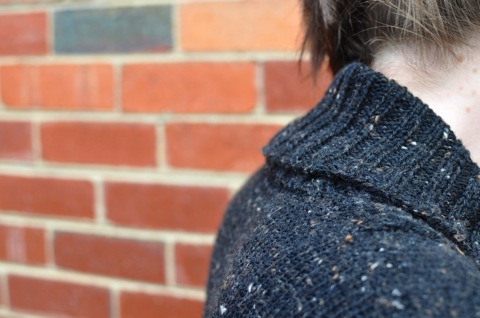
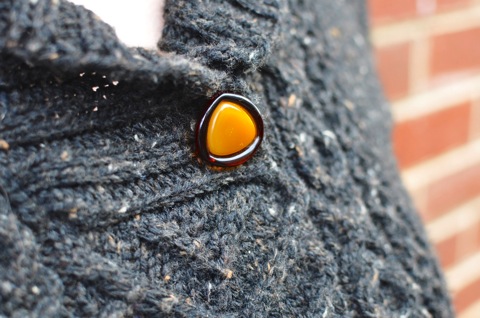
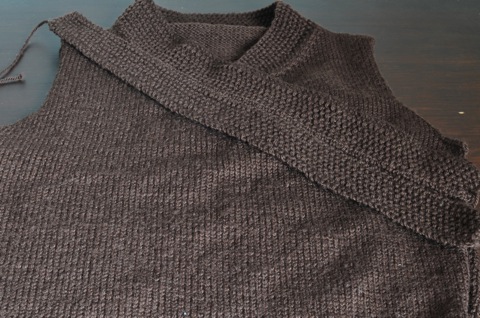
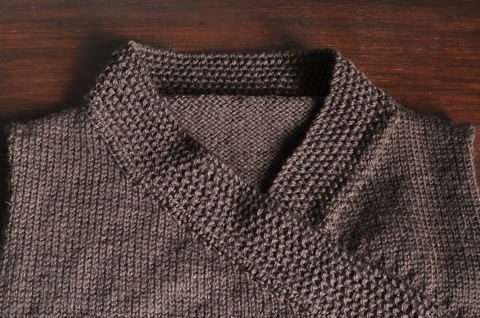
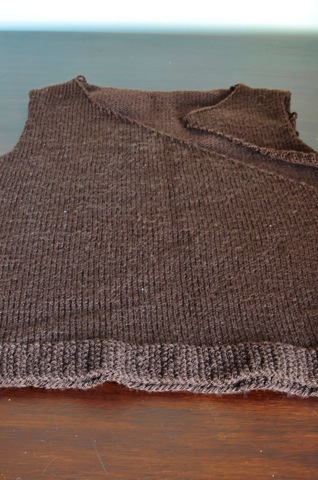
I cast on Tri-Cable Stitch Jumper from A Stitch In Time Volume 2 as soon as Variation on Cable Stitch was done. It’s got all the hallmarks of a slow knit, with all its cables and ribbing and 4ply yarn and small(ish) needles, but it’s flown off the needles.

tri cable back.jpg

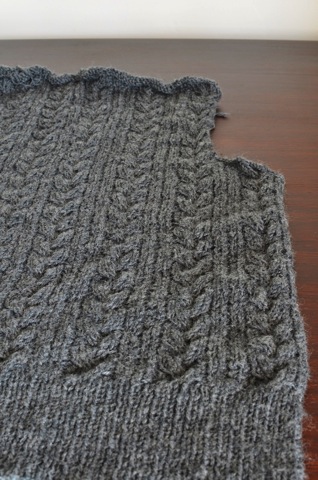
A lot of that has to do with the yarn, Patons Dreamtime 4ply, which is pretty much the perfect charcoal grey and a delight to look at. It’s a surprising colourway for a yarn that I thought was a baby yarn, but I’m not complaining.

button band lip.jpg

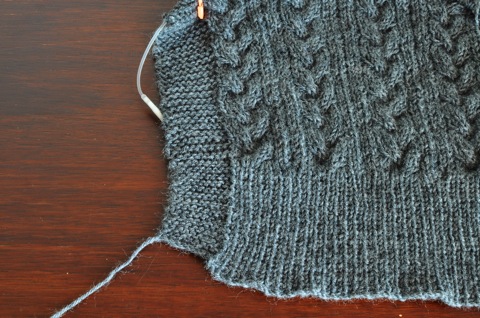
The button bands for the front pieces are knit with the front piece, which has caused this weird little lip at the bottom of the piece. It’s a little bit annoying but I think I’ll learn to live with it.

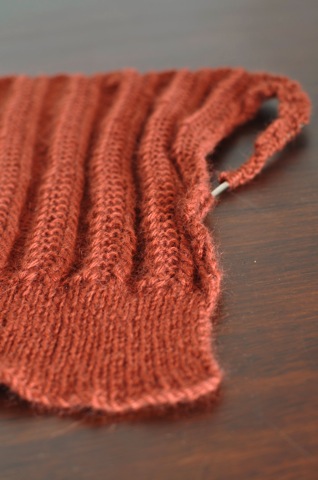
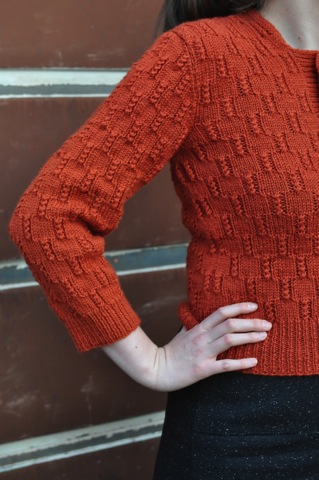
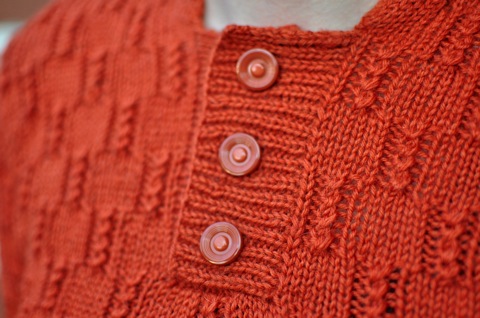
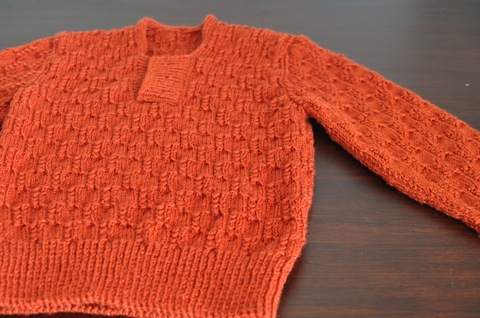
The other project I’m working on at the moment is a dolman sleeve cardigan from Lee Target (pattern available from Skiff Knitting). The yarn I’m using for this projects is some rusty 8ply pure alpaca Matt’s mum gave me a few years ago.

Lee Target cardigan.jpg

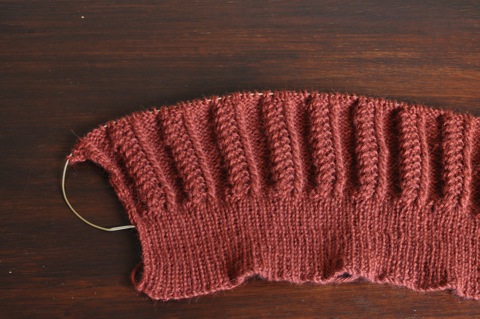
The pattern is easy to remember but requires enough concentration that it’s not really autopilot knitting. It’s knitting up pretty quickly at the moment, but the combination of yarn and stitch pattern means it’s difficult to count rows to space increase rows correctly. Luckily, I know of a good row counter to do the remembering for me.

I really like the colour and how the pattern’s coming up in this yarn, but there’s the quiet concern about how it’ll hold up once it’s finished. There’s no doubt that it’ll pill like the dickens, but given it’s alpaca, I’m somewhat concerned about how much it’ll drop. I’ve mitigated that risk a little by knitting it at a tighter gauge, but time will tell how well it’ll wear.

There’s one more project that I’m working on, but it’s within a hair’s breadth of being finished so I’ll hold off until it’s done and ready for the great (in the loosest sense of the word) reveal.

How have you brought in the start of the year, craft-wise?

Free Vintage Pattern: Variation of Cable Stitch

Heeeeeeeeere’s a download of Variation of Cable Stitch! Click on the image to get to a pdf version of the pattern.

Variation of Cable Stitch

Variation of Cable Stitch (Hughes pattern No. 710) from Hughes Book No. 208 (Ladies Designs 32-36″)
Sizes: 32″ and 36″ bust
Needles: UK 11/3mm and UK 8/US 6/4mm
Gauge: 5.5 stitches and 8 rows per inch
Ravelry Pattern Page: here

The gauge seems a standard 8ply/DK yarn, which is what I used. To make the larger size with minor modifications, I needed 550g (approximately 1100 metres or 1200 yards) of yarn. For me, it was a pretty quick and easy knit; the only thing to watch out for is the neck, which I felt was a bit small (noting that my neck is neither swanlike nor graceful).

This is my first attempt at posting a vintage pattern, so please let me know if it works OK (or doesn’t, as the case may be).

After some very helpful advice from Bex and a couple of hilariously awkward phone calls to companies related to FW Hughes (the company that produced the pattern) I was able to establish that it was OK to post the pattern.

The people I spoke to about reproducing the pattern were very nice and helpful, but I’ve never heard ‘sorry, you want to do what?’ so many times in my life. In the process of explaining who I was and what I wanted to do, I did find out some interesting tidbits about how Hughes had been bought out, and that the department that handled the knitting patterns was shut down in 1986. Although it was a bit sad to hear about its demise, it wasn’t altogether surprising given I was calling businesses that were in the wool industry, but no longer in the hand knitting industry.

Hearing about how FW Hughes had been bought out and subsequently changed reminded me of Australian Country Spinners, and how it has evolved over the years. The recent Landline piece about ACS has been doing the rounds on the Australian Knitters board on Ravelry but if you haven’t checked it out, it’s well worth a look. Fingers crossed it’s not geoblocked outside of Australia. Spoiler alert: there is a minuscule glimpse at ACS’s pattern archive. I would pay good money to spend some quality time leafing through those patterns, no lie.

Variation of Cable Stitch

Variation of Cable Stitch.jpg

Variation of Cable Stitch From Hughes Book No. 208, Ladies Designs 32-36″
550g Morris and Sons Estate 8ply, Tuscan
4.00mm and 3.00mm needles
Started: April 2013
Finished: November 2013
Modifications: Shorter button placket, extended the collar to start/finish lower, narrower sleeves
Ravelryed: here

It is finished and I’m completely besotted with it. My confidence in it wavered a few times, but now that the buttons are on and I’ve been able to sneak in one wear of it before it gets too hot (thank you Melbourne weather), I’m very happy with how it turned out.

The orange is a surprise hit. As soon as I bought the booklet containing this pattern, I knew that orange would work well with it. The thing I’m most surprised by is how I like it, though it’s unlikely to replace grey as my go-to colour.

Roomy sleeve.jpg

The modifications I made to the pattern were relatively minor. As mentioned before, I made a couple of changes to the neck so the top of the button band sat at the top of my sternum. This involved shortening the button band and lengthening the collar to meet the top of the button band. I also knit the sleeves in the smaller size, so they didn’t billow as much. This did make easing the sleeve a little challenging, but I’m glad I opted for smaller sleeves. Even now, they might be on the biggish side, but it’s nothing I cannot live with.

This project was another example of my inability to judge yarn requirements, as I ended up needing three balls from a different dye lot to finish the jumper. The dye lots were pretty close but still required a little bit of blending to make sure it wasn’t really obvious.

The yarn felt like a standard pure wool 8ply to me; the stitch definition was great and it held up well to multiple froggings. It feels a bit itchy against my neck but it’s nothing I can’t handle. The only thing I’m dubious about is its claim that it’s machine washable, because it felted like a dream when I used felted joins throughout the jumper. This one will never (intentionally) see the inside of washing machine for as long as its mine.

Button button.jpg

Buttonmania came through with the goods, button-wise. When I took the jumper in to Kate, I’d decided that dark brown leather buttons were the way to go. The buttons I walked out with are definitely not dark brown or leather, but I really like them.

As it was a pretty straightforward and fun knit, I’d really like to make the pattern available for others to knit, but have no idea how to establish whether it’s out of copyright. There’s no date on the pattern booklet, and as far as I know the company that produced the booklet is no longer in business. Anyone have any pointers on how I can go about establishing if it’s out of copyright, or getting permission to reproduce the pattern here?

I heart tweedy cables

I heart aran.jpg

I Heart Aran by Tanis Lavallee
around 600g Bendigo Woollen Mills Highlands, Cinder
4.00mm and 3.50mm needles
Started: October 2012
Finished: October 2013
Ravelryed: here

I Heart Aran is the second last of my old modern FOs from earlier this year. All the knitting and seaming was finished in time for this year’s Bendigo Sheep and Wool Show, but it took until a couple of weeks ago to sew on the button. Sometimes 10 minute jobs require months of mental preparation.

It’s the perfect winter jumper with its tweed and cables and a collar I can snuggle into. Even though I opted to knit it out of 8ply instead of aran weight yarn, I can confirm that it is an excellent shield against bitterly cold and wet days.

Because I made it out of 8ply, I made a heap of little alterations to the pattern to make the yarn/pattern combination work. I also lengthened the sleeves and used a three needle bind off at the shoulders rather than the suggested grafting. For a jumper this heavy, I think grafting shoulders together would lead to the jumper dropping; it’s really a spot that needs the structure of a seam.

Roomy.jpg

If I were to make it again, I’d make the body a bit smaller (it’s a lot roomier than I’m used to!), make the shoulders narrower and change the collar so that back of the jumper is cast off and stitches picked up, rather than using live stitches. Like the shoulders, I think a large shawl collar like this one needs the structure of a seam. Otherwise, it starts to collapse on itself like it’s starting to here:

collar slouch.jpg

These concerns don’t detract from the jumper too much, but it makes it hard to recommend the pattern. I don’t think it’s a pattern you can blindly trust and follow; there are quite a few spots where more detail could be provided and better, more appropriate, techniques could be used. So, if you’re super keen to make it, I highly recommend having a really close, critical read through before casting on.

butterscotch button.jpg

Lastly but not leastly, my absolute favourite part of this jumper has nothing to do with knitting. I picked up this vintage button not long after casting on, and I’ve been marvelling at its shiny butterscotch-like form and colour for nearly a year. I’m not entirely sure that it matches the jumper, but I’m so pleased it’s in use and no longer simply a desk ornament.

It came from Haberdash in Castlemaine, a place I cannot speak highly enough of. If you have even a passing interest in vintage crafts, this place is well worth a visit. It’s a treasure trove.

Where’s my WIPs at?

I know I’ve made a terrible grammar faux pas in the title, but it reminds me of a Basement Jaxx track with a somewhat disturbing monkey/human video. So, the grammar crime remains and I refuse to show any remorse for it.

Anyhoo, this is just a short update on my two WIPs. First up is a Variation of Cable Stitch.

It sits before me as an almost complete jumper and even though I’m the only one who has worked on it, I’m surprised it’s nearly there. Since last mentioning it, I knit the sleeves and made minor ‘edits’ to the front to make the neckline a little lower at the front. It’s becoming increasingly apparent that I do not sport a graceful swan-like neck, so I suspect I’ll be making a lot more of these kinds of modifications in the future.

Variation on almost done.jpg

All that’s left to do is sew down the facings, give it a wash and then take it in to the lovely people at Buttonmania to find some buttons.

My other WIP is the brown jumper of immense frustration. Last time I mentioned it, I was getting increasingly annoyed at the hiccups I was encountering along the way. Since then, I’ve finished reknitting the button band and have almost finished one of the sleeves. It’s been quite the voyage of discovery, reworking those two parts of the jumper.

One of the things I discovered was the importance of seaming technique. On my first attempt at attaching the button band I used my default seaming method, mattress stitch, to attach the band to the body. Even though I had a lot of button band leftover, I didn’t realise that I was stretching button band out a lot. To show you how much, the strip of moss stitch sitting on top of the jumper is the original button band; it’s probably two thirds of the length of the current button band.

Mattress stitch button band.jpg

The new button band is attached using whip stitch, which worked a treat. I hadn’t contemplated using whip stitch for button bands before, and it was only because I accidentally saw mention of it in A Stitch In Time Volume 2 that I tried it. It was a proper happy accident.

whip stitch neckline.jpg

The other thing I realised was that there was absolutely no chance of easing the sleeve into the armhole on my first attempt. This was primarily because I’d cast on 10 stitches less than I was meant to, and had, in turn, knit 10 rows more than I was meant to. This spectacular misreading of the pattern is probably my best bout of dufferism of late.

Even after removing the 10 extra rows, the sleeve would still probably be a bit too big. I’ve made the sleeve smaller again, and even though it’s looking a lot better, the lack of precision is upsetting me a little. If I wasn’t so far into reworking the sleeves, I would definitely use this tutorial from By Gum By Golly. It would pretty much solve all of my problems (except the whole duffer thing).

How about you, where’s your WIPs at?

An impatient frustration

While we were on hols, the swatch mentioned in this post became the pieces of a jumper. It was my constant knitting companion, working on it while waiting to board planes/trains/buses, while on planes/trains/buses, while queueing and while having a rest from sightseeing. During that time, the friendship has had its ups and downs. At the moment, we’re on a break (as if the fold lines in this photo didn’t give that secret away).

folded cross over line.jpg

Since casting on in June, I’ve finished all the pieces, and when it’s finished, all pieces will have been reknit at least once. Rather than bore you with slightly whiny paragraphs, let’s get this over and done with via dot points:

  • The back was reknit after it became evident that it wasn’t going to fit properly around the waist (read: I do not have a vintage-sized waist);
  • When knitting the button band, I could not, for the life of me, get the buttonholes to resemble what they looked like in the pattern photo. Now the button band will be knit sans buttonholes, but will have press studs and ‘for decorative purposes only’ buttons;
  • After knitting all the pieces and starting to seam, the neck was a lot narrower than expected. This resulted in the front pieces being reknit to prevent strangulation by jumper; and
  • The sleeves are far too big to ease in. In this pattern, the sleeves are knit from the top down so the whole sleeve has to be frogged.

I can’t hide my frustration, but it’s an impatient frustration rather than ‘I hate this stupid pattern and never want to see it again’. When I started seaming, I tacked the sides together so I could try it on. Besides the strangulation hazard it posed, I loved it. The body’s shorter than I’m used to, but it’s going to look great over dresses and with some of my high waisted skirts. I cannot wait to wear it, but the modifications required are just a bit too mentally taxing for me at the moment.

The problems seem to be a mixture of a few things. Part of it is just how the pattern works with my body type; which can be an issue with any pattern, irrespective of when it was published. The other part is related to details, or lack thereof, in the pattern.

The pattern doesn’t list a row gauge, which isn’t normally an issue when a pattern gives certain measurements to knit to. This pattern, however, is riddled with ‘knit x rows’-type instructions, so not knowing the row gauge is akin to flying blind and hoping for the best. It hasn’t really worked out so far, but there’s definitely enough good in there to keep me motivated.

Wearable muslin

Get your hands out of your pockets, Emma.jpg

Pattern: Crepe by Colette Patterns, version 1
Fabric: chambray from Spotlight
Started: about a year ago
Finished: when it was too cold and dreary to take photos of it outside, 2013

Late last year and early this year, Matt and I attended a spate of weddings. I have no idea what the collective noun for weddings is – a celebration of weddings perhaps? Whatever it actually is, we just call that period of our lives Weddingpalooza.

This dress was part of an optimistic idea to make a dress to wear to some of the weddings. Specifically, it was the proof of concept before cutting into the actual fabric I wanted to use to make the Weddingpalooza dress.

I have an admittedly irrational fear of sewing, mostly because you can’t frog a mistake like you can in knitting. So, every step was taken very carefully and deliberately; multiple muslins of the bodice were made, adjustments drafted, measuring multiple times before cutting, unpicking when things were even a little bit off. In the end, I only made three adjustments to the pattern. The first one was to narrow the neckline so it sat on my shoulders better. Then I adjusted the back pieces to account for the changes to the front. Lastly, I took a little bit out of the shoulders because I wasn’t rocking the linebacker look as well as I thought I would.

linebacker.jpg

The result isn’t without its flaws – the bodice is probably a wee bit short, the placement of the darts is a bit off and there’s probably a little too much fabric in the bodice. I also have ongoing problems with the armhole facings, where I have to tuck them in when I put them on, even after tacking them down at the top and bottom. Despite these issues, I’m still really chuffed with the result. I think the dress looks great in chambray and cannot wait to wear it now that the weather’s warmer.

Back of the dress.JPG

Despite my general trepidation about sewing, this really wasn’t a difficult pattern to put together. The pattern instructions were very clear, and on the odd occasions when I was confused, Gertie’s Crepe Sew-along posts were really helpful.

As for the actual weddingpalooza dress, it never happened. Although I thought I’d left enough time to make the trial and actual dresses, life became a bit too busy and something had to give. In hindsight it was probably for the best as the fabric I chose, a pretty poplin, was a bit too stiff for the pattern.

Poplin.jpg

Not all is lost for this fabric, for one day it’s destined to become a Macaron. All it’ll take is for me to build some confidence and learn the gentle art of zipper installation.

The tie

It’s Spring and it’s windy so it’s the perfect time to get Matt outside to model the tie I made him earlier this year.

fly away tie.jpg

Seed Stitch Tie, a hybrid of a Lion Brand pattern, a tie pattern from Knit Two Together and a TECHknitting tutorial
Around 30g Habu Textiles A-1 2/17 Tsumugi Silk, dark blue (held double)
2.00 and 2.25mm needles
Started: Some time in 2012
Finished: April 2013
Ravelryed: here

The last mention of this project was aaaaaalllll the way back in November, where all that was left to do was the seaming. At first I tried using mattress stitch (my default seaming method) with the stocking stitch ‘tram tracks’ on the inside. It may be an exaggeration, but I hated every minute of it. The seaming made the tie snake this way and that, and keeping the tram tracks on the inside was making it puff out into a tube. It was doing pretty much the exact opposite to what I wanted the tie to do. In desperation, I unpicked the seam, flipped the tie inside out (so the tram tracks were outside) and used back stitch. It seemed to do the trick!

wearably wonky.JPG

It still snakes a little from side to side and now you can see the tram tracks on the outside edge of the tie, but let me assure you it’s a lot better than what it was. It’s gone from ‘please don’t wear this in public ever’ to wearably wonky.

Tsumugi Silk has a great tweedy-ness to it which lent itself well to this tie. The only drawback to it is its lack of memory. Since coming off the needles, it’s dropped a little bit, and I can see that it’s going to need periodic shortening. If I knit another tie using this pattern(s), I’ll be using something with a bit of memory. Hopefully that’ll stop it from stretching out so much.

hot dimple action.jpg

Since Matt’s been reading the menswear blog Put This On, the mark of a good tie seems to be based largely on the tie knot and dimple. This tie appears to make a good knot and hold quite a sizeable dimple, so for all my griping, it’s mission accomplished.