Archive for the ‘Finished objects’ Category

Elijah IV

elijah the fourth.jpg

Elijah by Ysolda Teague
Approximately 100 grams of Bendigo Woollen Mills Luxury 8ply, Bark
Black embroidery thread
3.25mm double pointed needles
Started: August 2014
Finished: September 2014
Ravelryed: here

A couple of months ago, my Mum asked me to whip up an Elijah for a colleague’s baby. Because it’d been over four years(!) since I’d made my last Elijah and Mum asked nicely, I obliged. I didn’t have anything suitable in my stash, so I sent Mum off to the Bendigo Woollen Mills for some Luxury 8ply in her choice of colour. The colourway Mum chose, Bark, was the perfect colour for a knitted elephant. That’s not to say that a knitted elephant should be any colour in particular, but that grey/brown shade seems to be the one I’ve gravitated towards for previous Elijahs.

This is my fourth go around the pattern so there’s not much to add to my previous three experiences. I still find the cast on for the head quite tricky, but this video helped a lot. In particular, I previously divided the cast on stitches across the three dpns right away, where this tutorial suggested knitting the first couple of rounds like an icord. Revolutionary!

Like always, it was difficult to let him go to his new home. Maybe Elijah V will be mine.

Tri-Cable Stitch Cardigan

tri-cable, done.jpg

Ti-Cable Stitch Cardigan from A Stitch In Time, Volume Two
400 grams Patons Dreamtime 4ply, Charcoal
3.75mm and 3.00mm needles
Started: November 2013
Finished: August 2014
Modifications: Nothing!
Buttons: Buttonmania
Ravelryed: here

Since casting this cardigan on in November last year, I was excited about wearing it. The whole process was an illustration of an ideal knitting project; I really enjoyed seeing the marled grey cables come together to form braids up the body and arms, and often daydreamed about wearing it once it was done. In stark contrast to my usual knitting behaviour, I managed to finish it while there were plenty of weather-appropriate days left to wear it.

Tri-cable, back.jpg

There were no modifications made to the pattern, as my gauge was spot on and everything seemed to come together reasonably well. Noting that I’m never completely happy, I had a crisis of confidence over the length of the sleeves at one point. They are longer than I usually wear, but not ‘too long’ as I moaned to friends and family, who patiently sat through me demonstrating the length of the sleeves prior to seaming them to the body.

Tri-cable, the bow.jpg

If I were to make this again, I’d shorten the sleeves slightly, lengthen the ties and deal with the lip at the bottom of the cardigan, caused by the knitted-in button band. Like the sleeves, the button band isn’t a deal-breaker, but I think knitting and seaming on a separate button band would make for a slightly nicer finish. These are, however, minor quibbles; the cardigan was a joy to make and is now a joy to wear.

Celebratory herringbone socks

Herringbone socks, sans feet.jpg

Herringbone Socks from New Sock Fashions in Wool by Styled by Hilda, via Free Vintage Knitting Patterns
120-ish grams Patonyle 4ply, Navy
2.25mm and 2.50mm needles
Started: April 2014
Finished: May 2014
Modifications: Switched back to the smaller needles for the foot
Ravelryed: here

Whew. Now I’ve got the last post off my chest (thank you everyone for your kind words about the jumper), I can move onto happier things.

Over the Easter break, I wanted to do work on something that wasn’t a cardigan so I cast on these socks. They were a dream to knit; the pattern was interesting but easy to remember, the slip stitch heel flap created a lovely spongy fabric and even the most monotonous part of the sock (the feet) flew by. This is how I remember knitting being.

Herringbone socks, with feet.jpg

I really liked the not-very-herringbone herringbone pattern, but it does look a bit gappy on Matt’s skinny legs. The decreases for the toe and heel suffer from the same gappiness, so I wonder if it was a combination of the pattern, the yarn and my technique. It doesn’t matter too much, as Matt seems very happy with them and they still look quite handsome despite the flaws. It’s also another addition to his sock drawer; hopefully one day soon we’ll reach a point where handknit socks are for wearing and not just for admiring and worrying about destroying them through wear.

Pillow heel.JPG

Although I didn’t end up finishing them by the end of the Easter break, I did finish them at the same time as Matt finished a wee project he’d been working on for the last few months (avert your eyes if you’re sensitive to product plugs, there’s a shameless one ahead). It’s called RavExporter, which is a plugin for iPhoto and Aperture that allows Ravelry users to export their photos directly from iPhoto or Aperture into a project or stash item. The backstory is that I use Aperture on my Mac to store all my photos, and it can get quite unwieldy when I’m trying to import stash or project photos into Ravelry. So, Matt wrote this plugin so I could get my photos into Ravelry more quickly. Productivity! If you’re a Mac user that uses Ravelry, do check it out. We’d love to hear what you think of it.

Unbecoming behaviour towards A Becoming Cross Over Line

The front.jpg

A Becoming Cross Over Line from Family Knitting in Thick Wool (from My Home Magazine)
400-ish grams Bendigo Woollen Mills Luxury 8ply, Acorn
3.25mm and 4.00mm needles
Started: June 2013
Finished: March 2014
Modifications: Where do I begin?
Ravelryed: here

This project was an excellent example of the gulf that sometimes exists between perception and reality.

I chose this project as my knitting travel companion for a holiday last year. The other contender was my Tri-Cable Stitch Jumper, that four-ply cable number from A Stitch In Time Volume Two. At the time, a cropped, mostly stockinette, 8ply jumper seemed to be the project that would cause the least amount of hassle while traveling around.

This is the point where my perception of the project became divorced from reality. In the few blog posts since coming back from the holiday, I’d mentioned the many hassles I’d had with the pattern. In the end, these are the modifications I made:

  • Cast on more stitches for the waist
  • Dropped the neckline, affecting the two front pieces and the neckband
  • Removed the buttonholes from the neckband
  • Knit the sleeves using Tasha’s top down in the round method
  • Seamed up the neckband so it became a pullover rather than button up jumper.

By the time I’d gotten to the fourth or fifth attempt at the sleeves, I was worn out and became lazy. So, the sleeves shows the scars of a yarn that has been frogged and knit and frogged and knit and frogged and you get the picture. I’m hopeful that as I wear and wash it, the scars will settle to charmingly minor variations in the fabric.

The cross.jpg

Once I worked out that I could seam up the neckband and still be able to fit my generously-sized head through the hole, I quickly seamed it up and called it done. The point where the sides meet up to make the v is very wonky and disappointingly unpolished, but there comes a point in some project’s life where it just needs to be finished.

The back.jpg

Despite feeling mildly exhausted and disappointed whenever I wear it, it turned out not too bad. I really like the length of the sleeves and the cropped length makes it perfect for the fit and flare dresses I wear it with. I most certainly won’t be making this pattern again, but cropped jumpers and cardigans definitely have a place in my wardrobe.

This jumper seems to epitomise the difficulty that sometimes comes with vintage patterns; when you run into trouble, you’re generally on your own. This time the battle was worth it, but lordy did it ever try my patience!

Bendigo socks

Bendigo Socks.jpg

Sox (Dutch Heel) aka Design No. 1799 from Sun-Glo Knitting Book Series 15
110-ish grams Candlebark Country Socks Corriedale/Romney 5ply
2.25mm dpns
Started: July 2013
Finished: November 2013
Modifications: picked up more stitches around the heel flap, worked a few more decrease rounds at the foot.
Ravelryed: here

These socks were part of Matt’s Christmas present last year. They were knit on public transport, at Stitches and Bitches and at various other points in time where Matt wouldn’t see them in progress. Evidently I did a good job of hiding them, because he was thoroughly surprised (or so he tells me).

Both the yarn and the pattern came from Bendigo on the Sheep and Wool Show weekend. The yarn was from Corriedale/Romney sheep from a farm just outside of Bendigo, and the pattern from a stack of vintage patterns I picked up from the Sheep and Wool Show. I generally not location-loyal when it comes to buying things, there’s still enough hometown pride left in me to be tickled by the Bendigo-ness of it all.

Toesies.JPG

I think these socks are one of the best yarn/pattern combinations I’ve ever come across. The socks are pretty basic ribbed socks, but the rustic, slightly slubby texture of the yarn lends itself well to a fairly plain ribbed sock.

The yarn was quite good to work with. It still had a slightly greasy texture from the lanolin left in it, and there was a little bit of vegetable matter that was fairly easy to pick out as I went along. It turns out I quite like working with that kind of toothy, unrefined yarn; it’s not something I’d really want against my neck, but even without nylon in it it seems tough enough to handle the wear and tear of being sandwiched between a foot and a boot.

Heelsies.JPG

One thing about the yarn I didn’t care for was the smell when I was blocking the yarn. Because of the lanolin content I was expecting a wet sheep smell, but as soon as it hit the water, it gave off a pungent camphor/petroleum smell. It was so strong that even though I was blocking it in a room with the door closed and the window open, the smell was still wafting into other parts of the house. Once the socks were dry the smell disappeared, but I’m not particularly looking forward to their next wash.

The pattern itself is fairly unremarkable, it’s just a fairly long (4.5 inch cuff, 12 inch leg) sock with a dutch heel (which, incidentally, seems to be Matt’s preferred heel type. Just so you know). The pattern book was published in 1940, so it’s unsurprisingly quite utilitarian in its design. The only modification I made was to pick up more stitches along the heel flap and increased the number of decrease rows to account for those extra stitches.

All pretty straightforward, but a lovely result nonetheless.

Variation of Cable Stitch

Variation of Cable Stitch.jpg

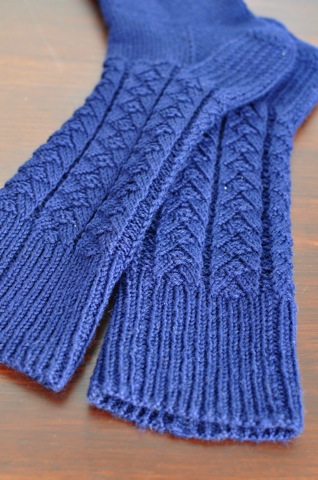
Variation of Cable Stitch From Hughes Book No. 208, Ladies Designs 32-36″
550g Morris and Sons Estate 8ply, Tuscan
4.00mm and 3.00mm needles
Started: April 2013
Finished: November 2013
Modifications: Shorter button placket, extended the collar to start/finish lower, narrower sleeves
Ravelryed: here

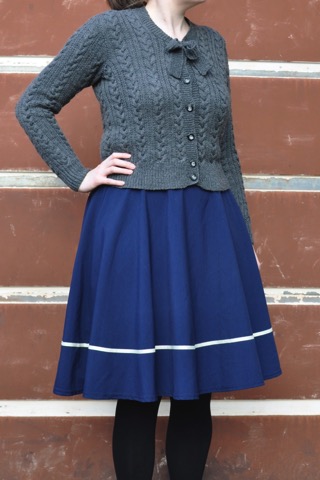
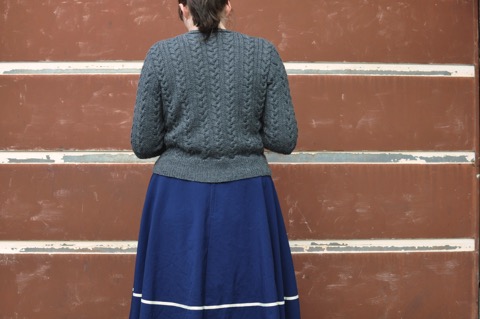
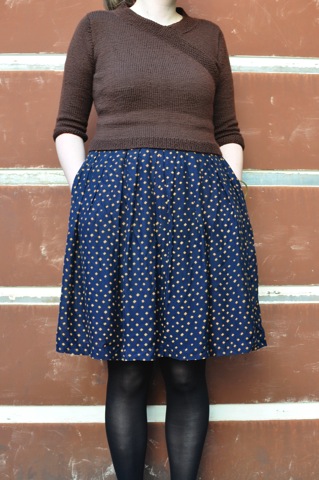
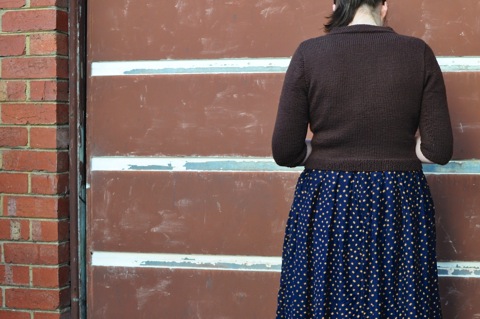
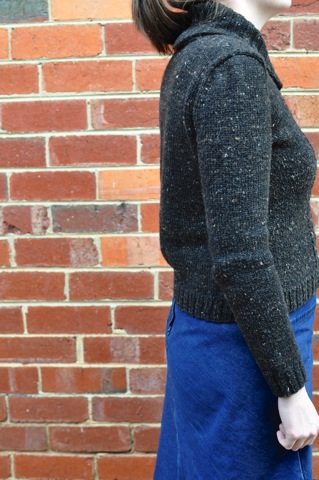
It is finished and I’m completely besotted with it. My confidence in it wavered a few times, but now that the buttons are on and I’ve been able to sneak in one wear of it before it gets too hot (thank you Melbourne weather), I’m very happy with how it turned out.

The orange is a surprise hit. As soon as I bought the booklet containing this pattern, I knew that orange would work well with it. The thing I’m most surprised by is how I like it, though it’s unlikely to replace grey as my go-to colour.

Roomy sleeve.jpg

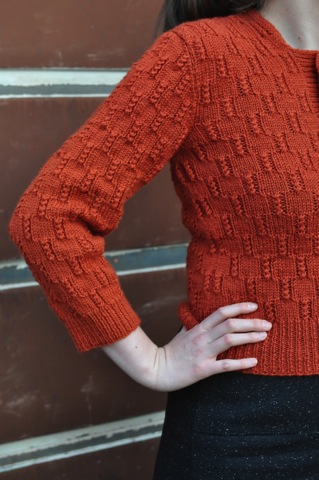
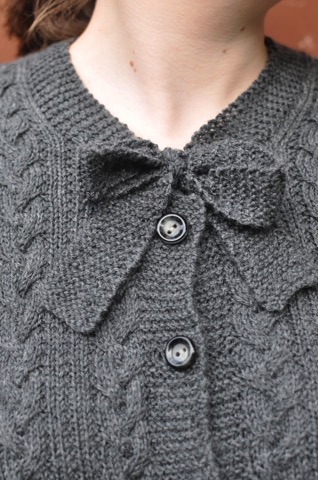
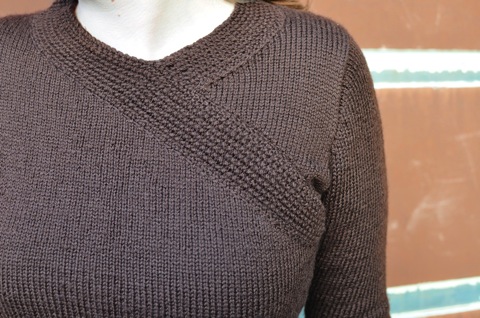
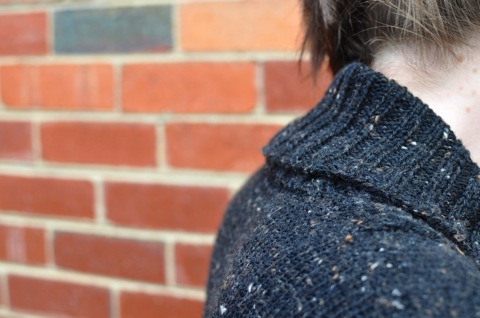
The modifications I made to the pattern were relatively minor. As mentioned before, I made a couple of changes to the neck so the top of the button band sat at the top of my sternum. This involved shortening the button band and lengthening the collar to meet the top of the button band. I also knit the sleeves in the smaller size, so they didn’t billow as much. This did make easing the sleeve a little challenging, but I’m glad I opted for smaller sleeves. Even now, they might be on the biggish side, but it’s nothing I cannot live with.

This project was another example of my inability to judge yarn requirements, as I ended up needing three balls from a different dye lot to finish the jumper. The dye lots were pretty close but still required a little bit of blending to make sure it wasn’t really obvious.

The yarn felt like a standard pure wool 8ply to me; the stitch definition was great and it held up well to multiple froggings. It feels a bit itchy against my neck but it’s nothing I can’t handle. The only thing I’m dubious about is its claim that it’s machine washable, because it felted like a dream when I used felted joins throughout the jumper. This one will never (intentionally) see the inside of washing machine for as long as its mine.

Button button.jpg

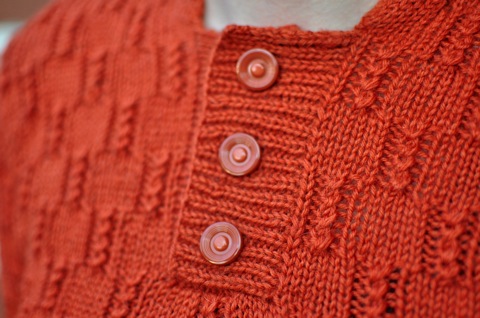
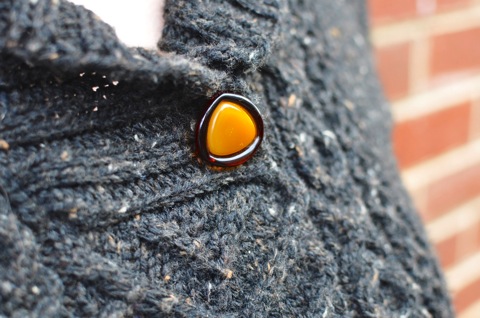
Buttonmania came through with the goods, button-wise. When I took the jumper in to Kate, I’d decided that dark brown leather buttons were the way to go. The buttons I walked out with are definitely not dark brown or leather, but I really like them.

As it was a pretty straightforward and fun knit, I’d really like to make the pattern available for others to knit, but have no idea how to establish whether it’s out of copyright. There’s no date on the pattern booklet, and as far as I know the company that produced the booklet is no longer in business. Anyone have any pointers on how I can go about establishing if it’s out of copyright, or getting permission to reproduce the pattern here?

I heart tweedy cables

I heart aran.jpg

I Heart Aran by Tanis Lavallee
around 600g Bendigo Woollen Mills Highlands, Cinder
4.00mm and 3.50mm needles
Started: October 2012
Finished: October 2013
Ravelryed: here

I Heart Aran is the second last of my old modern FOs from earlier this year. All the knitting and seaming was finished in time for this year’s Bendigo Sheep and Wool Show, but it took until a couple of weeks ago to sew on the button. Sometimes 10 minute jobs require months of mental preparation.

It’s the perfect winter jumper with its tweed and cables and a collar I can snuggle into. Even though I opted to knit it out of 8ply instead of aran weight yarn, I can confirm that it is an excellent shield against bitterly cold and wet days.

Because I made it out of 8ply, I made a heap of little alterations to the pattern to make the yarn/pattern combination work. I also lengthened the sleeves and used a three needle bind off at the shoulders rather than the suggested grafting. For a jumper this heavy, I think grafting shoulders together would lead to the jumper dropping; it’s really a spot that needs the structure of a seam.

Roomy.jpg

If I were to make it again, I’d make the body a bit smaller (it’s a lot roomier than I’m used to!), make the shoulders narrower and change the collar so that back of the jumper is cast off and stitches picked up, rather than using live stitches. Like the shoulders, I think a large shawl collar like this one needs the structure of a seam. Otherwise, it starts to collapse on itself like it’s starting to here:

collar slouch.jpg

These concerns don’t detract from the jumper too much, but it makes it hard to recommend the pattern. I don’t think it’s a pattern you can blindly trust and follow; there are quite a few spots where more detail could be provided and better, more appropriate, techniques could be used. So, if you’re super keen to make it, I highly recommend having a really close, critical read through before casting on.

butterscotch button.jpg

Lastly but not leastly, my absolute favourite part of this jumper has nothing to do with knitting. I picked up this vintage button not long after casting on, and I’ve been marvelling at its shiny butterscotch-like form and colour for nearly a year. I’m not entirely sure that it matches the jumper, but I’m so pleased it’s in use and no longer simply a desk ornament.

It came from Haberdash in Castlemaine, a place I cannot speak highly enough of. If you have even a passing interest in vintage crafts, this place is well worth a visit. It’s a treasure trove.

Wearable muslin

Get your hands out of your pockets, Emma.jpg

Pattern: Crepe by Colette Patterns, version 1
Fabric: chambray from Spotlight
Started: about a year ago
Finished: when it was too cold and dreary to take photos of it outside, 2013

Late last year and early this year, Matt and I attended a spate of weddings. I have no idea what the collective noun for weddings is – a celebration of weddings perhaps? Whatever it actually is, we just call that period of our lives Weddingpalooza.

This dress was part of an optimistic idea to make a dress to wear to some of the weddings. Specifically, it was the proof of concept before cutting into the actual fabric I wanted to use to make the Weddingpalooza dress.

I have an admittedly irrational fear of sewing, mostly because you can’t frog a mistake like you can in knitting. So, every step was taken very carefully and deliberately; multiple muslins of the bodice were made, adjustments drafted, measuring multiple times before cutting, unpicking when things were even a little bit off. In the end, I only made three adjustments to the pattern. The first one was to narrow the neckline so it sat on my shoulders better. Then I adjusted the back pieces to account for the changes to the front. Lastly, I took a little bit out of the shoulders because I wasn’t rocking the linebacker look as well as I thought I would.

linebacker.jpg

The result isn’t without its flaws – the bodice is probably a wee bit short, the placement of the darts is a bit off and there’s probably a little too much fabric in the bodice. I also have ongoing problems with the armhole facings, where I have to tuck them in when I put them on, even after tacking them down at the top and bottom. Despite these issues, I’m still really chuffed with the result. I think the dress looks great in chambray and cannot wait to wear it now that the weather’s warmer.

Back of the dress.JPG

Despite my general trepidation about sewing, this really wasn’t a difficult pattern to put together. The pattern instructions were very clear, and on the odd occasions when I was confused, Gertie’s Crepe Sew-along posts were really helpful.

As for the actual weddingpalooza dress, it never happened. Although I thought I’d left enough time to make the trial and actual dresses, life became a bit too busy and something had to give. In hindsight it was probably for the best as the fabric I chose, a pretty poplin, was a bit too stiff for the pattern.

Poplin.jpg

Not all is lost for this fabric, for one day it’s destined to become a Macaron. All it’ll take is for me to build some confidence and learn the gentle art of zipper installation.

The tie

It’s Spring and it’s windy so it’s the perfect time to get Matt outside to model the tie I made him earlier this year.

fly away tie.jpg

Seed Stitch Tie, a hybrid of a Lion Brand pattern, a tie pattern from Knit Two Together and a TECHknitting tutorial
Around 30g Habu Textiles A-1 2/17 Tsumugi Silk, dark blue (held double)
2.00 and 2.25mm needles
Started: Some time in 2012
Finished: April 2013
Ravelryed: here

The last mention of this project was aaaaaalllll the way back in November, where all that was left to do was the seaming. At first I tried using mattress stitch (my default seaming method) with the stocking stitch ‘tram tracks’ on the inside. It may be an exaggeration, but I hated every minute of it. The seaming made the tie snake this way and that, and keeping the tram tracks on the inside was making it puff out into a tube. It was doing pretty much the exact opposite to what I wanted the tie to do. In desperation, I unpicked the seam, flipped the tie inside out (so the tram tracks were outside) and used back stitch. It seemed to do the trick!

wearably wonky.JPG

It still snakes a little from side to side and now you can see the tram tracks on the outside edge of the tie, but let me assure you it’s a lot better than what it was. It’s gone from ‘please don’t wear this in public ever’ to wearably wonky.

Tsumugi Silk has a great tweedy-ness to it which lent itself well to this tie. The only drawback to it is its lack of memory. Since coming off the needles, it’s dropped a little bit, and I can see that it’s going to need periodic shortening. If I knit another tie using this pattern(s), I’ll be using something with a bit of memory. Hopefully that’ll stop it from stretching out so much.

hot dimple action.jpg

Since Matt’s been reading the menswear blog Put This On, the mark of a good tie seems to be based largely on the tie knot and dimple. This tie appears to make a good knot and hold quite a sizeable dimple, so for all my griping, it’s mission accomplished.

Tricked up grey socks

diamond socks, aerial view.jpg

Gentleman’s sock with Lozenge Pattern by Nancy Bush
125g Patonyle 4ply, Charcoal
2.25mm needles
Started: February 2013
Finished: April 2013
Ravelryed: here

These socks were finished in April, but circumstances meant that I could only take photos of them yesterday. This meant that for about a month, I wouldn’t let Matt wear them for fear of them spontaneously disintegrating in his boots and thus going undocumented. Now that he has my blessing to wear them, they feel like they’re really finished.

The results are pretty pleasing but I’m glad they’re done. This is mostly because I ended up knitting approximately three socks in the pursuit of making two. Part of this was to make sure the socks fit Matt’s skinny legs, but most of it was because I wasn’t paying attention at the appropriate moments. In the end, I only made two minor modifications; the legs are narrower than given in the pattern, and the feet are longer.

When I first came across the pattern, I was drawn to the diamonds. Now that they’re done, the elements I like the most are the cuff and the faux seam that runs down the back of the sock. I think they look rather handsome and fancy up the socks just nicely.

the seam, the seam.jpg

The yarn did an impressive job of keeping it together as it was continually frogged and knocked around in my bag as I took it to and from work. However, by the end of the first sock, the cuff was starting to look a bit fluffy and in need of a visit from the magic depiller (the honeymoon period is still not over).

side on hipster view.jpg

Both Matt and I are people of simple tastes when it comes to yarn colourways. The more solid (and closer to grey) the colourway, the more we seem to like it. So while picking charcoal Patonyle might seem a boring choice, I think the solid grey suited both the pattern and the recipient well. Let’s hope they don’t spontaneously disintegrate upon contact with his boots.